A Student Report is a document designed to be shared with a student, so they can review their performance during a Plickers session. Among other features, Student Reports include your questions in full, the choices selected by a student, and an indication of the correct answers.
Customizable Student Reports can be created within our Scoresheets feature, and you'll have the option to share the documents by printing them or saving them to your computer.
We've included an example of what a Student Report looks like in the Customize Student Reports section a little further down in this guide.
Below we've included steps on creating, customizing, printing and saving Student Reports, starting with our Flash guide. Following that, you'll find a collection of more detailed steps.
Flash guide
- Sign in to plickers.com on your laptop/computer
- Select Scoresheets... from the left-hand sidebar
- Select the Class and dates you're working with
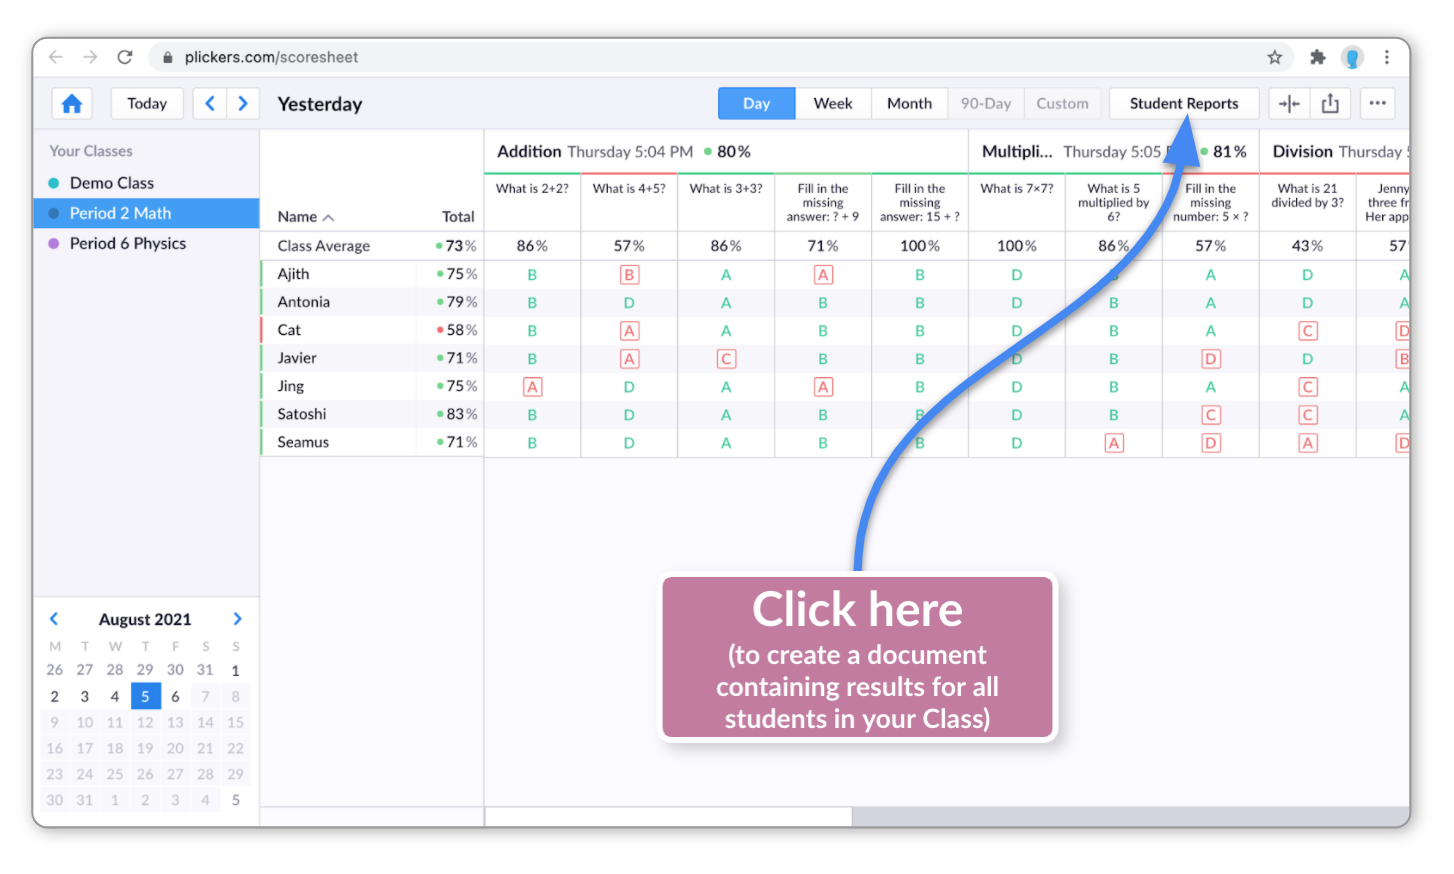
- Click on the Student Reports button in the top right-hand corner
- Click the blue 'Print' button
- Either connect to your printer or select the 'Save to pdf' option, and press confirm
Create Student Reports
There are two routes you can take to create a Student Report.
The first will create a bulk document containing sections for each student in your Class. The second allows you to specify which student to create a Student Report for, perhaps saving time and paper.
Student Reports are different to Reports. Student Reports provide information for individual students, while Reports show collated Class results for a specific content item.
-
To create a bulk document containing individual sections for each student:
-
Sign in to plickers.com on your laptop/computer
-
Select 'Scoresheet...' from the left-hand sidebar
-
Select the Class you're working with
-
Select the date of your session using the calendar
-
Ensure your intended Sets and questions are included in the Scoresheet
More information about this can be found in our guide called How to customize your Scoresheet, within the following toggle boxes at the bottom of the article:
- 'Include results from sessions across a range of dates'
- 'Exclude questions or Sets from total scores'
-
Click the Student Reports button in the top right-hand corner
-
Use the Print Student Reports window to customize the document
See the next section of this article for more information.
Head back up to check out individual Student Reports
-
-
This is effectively a way to split up the full document described in the adjacent tab into individual Student Reports.
-
Sign in to plickers.com on your laptop/computer
-
Select 'Scoresheet...' from the left-hand sidebar
-
Select the Class you're working with
-
Select the date of your session using the calendar
-
Ensure your intended Sets and questions are included in the Scoresheet
More information about this can be found in our guide called How to customize your Scoresheet, within the following toggle boxes at the bottom of the article:
- 'Include results from sessions across a range of dates'
- 'Exclude questions or Sets from total scores'
-
Click on the name of a student in your Class
Note that when you hover your cursor over a student name in the Scoresheet, you'll see the Student Reports icon
 appear. By clicking your mouse when that icon is visible, you'll be taken to the Print Student Reports window for that particular student.
 -
Use the Print Student Report window to customize the document
See the next section of this article for more information.
Head back up to check out bulk Student Reports
-
Back to top
Customize Student Reports
It's possible to choose what to include in your Student Reports by using the Print Student Reports window (this is where we ended the last section).
Here's what it looks like:
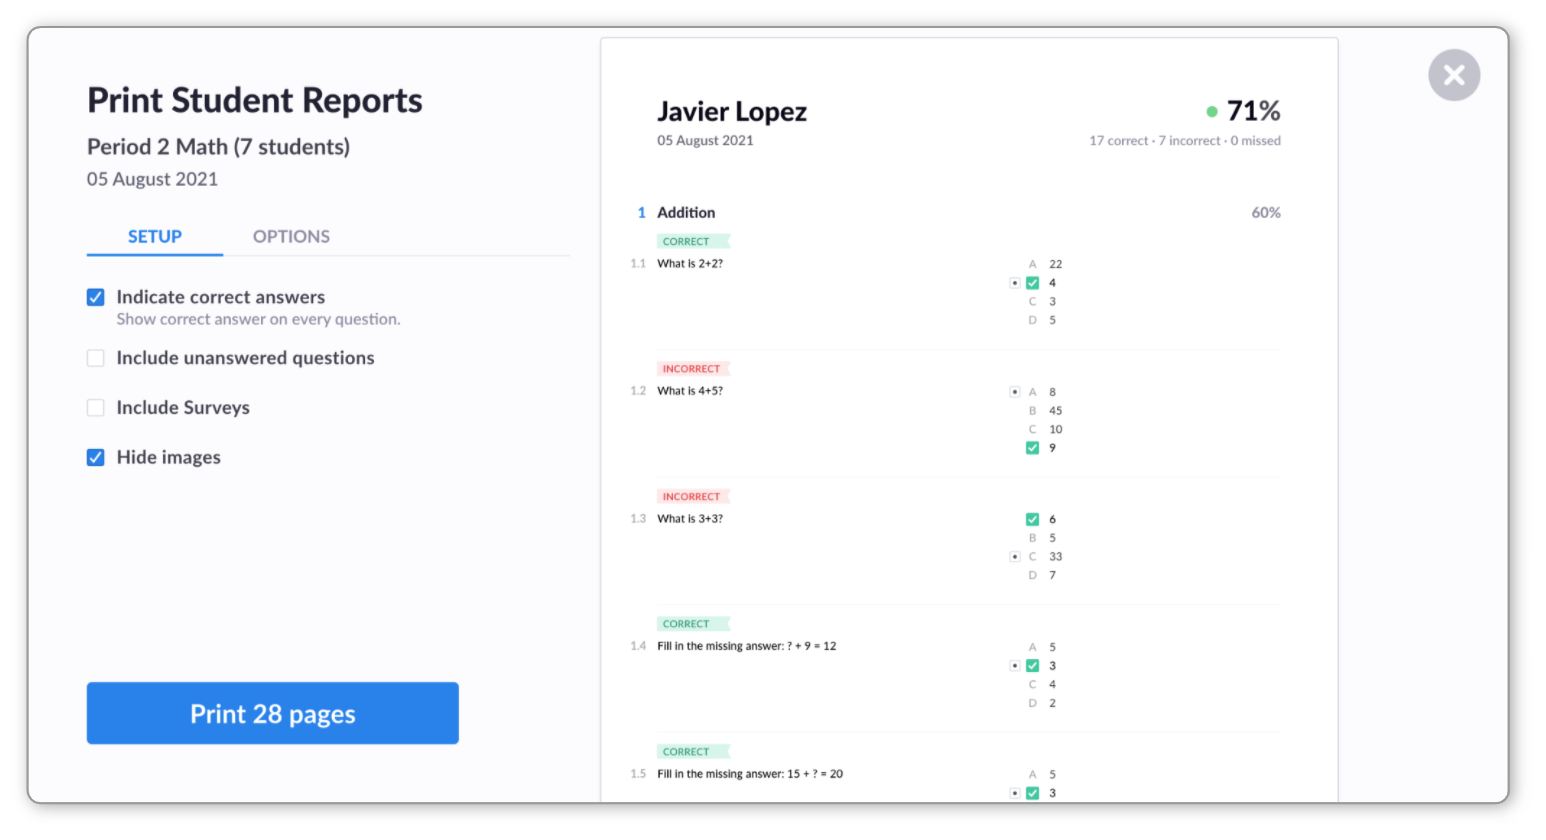
To customize a Student Report, check out the Setup and Options tabs on the left-hand side of the window - there are several different options to explore.
When you select or deselect any of the options available, you'll be able to see how they impact the document in the preview window on the right. Here's what you can try:
In the Setup tab:
-
If a student has answered a question incorrectly, you can choose whether or not to show the correct choice for that question.
You may want to leave this option unchecked if you want your students to spend time researching their incorrect answers.
-
If a student didn't raise their card for a question during your Plickers session, then that question won't be included in their average score.
So, you can choose whether or not to include it in their Student Report.
-
As Survey questions don't have a correct answer, they don't contribute to the total score included in the document.
Therefore, you can decide whether or not to include them in your Student Reports.
-
You can choose to include the images in your questions, or leave them out entirely. This is mainly just a question of aesthetics (and perhaps of saving printer ink!).
In the Options tab:
-
Choosing a two-column layout will mean fewer pages overall, and so will help to save paper if you're printing the Student Report.
-
The choice is between A4 or Letter size. A4 is slightly taller and narrower than Letter.
-
Set and question numbers appear on the left of the document if this option is checked.
The Set number appears first, followed by a decimal point, then the question number. So, question 11 in the second Set of the Student Report is shown as 2.11
-
It may be the case that a student has been removed (archived) from the Class since your Plickers session.
You can therefore choose whether or not to include that student in your full Student Report.
-
Guests are registered if a card number not linked to a student in your Class is used during a Plickers session.
For example, if you have 15 students in a Class (using card numbers 1 to 15) and someone uses card number 16, their answers will be attributed to 'Guest 1'.
You can use this checkbox to include or remove these Guest results in your Student Report.
Back to top
Save and print Student Reports
When you're happy with how your Student Report looks, the final thing to do is print or save your document.
Within Plickers the process is the same for both options, but it then differs slightly when you arrive at your browser's Print dialog box.
Select the appropriate tab below to find out more - both sets of steps begin from the Print Student Report window (where we left off in the section above).
-
You might want to save your Student Reports so that you can share them electronically with your students. Here's how:
-
Select the blue 'Print' button in the Print Student Reports window
A dialog box will appear, in which you can select your print settings.
-
Select 'Save as PDF'
You'll find this within a dropdown menu called 'Destination', or something similar.
(In Safari, look for a dropdown menu simply called 'PDF'.)
Check that the rest of the settings in the dialog box look ok.
-
Click the 'Save' button
Navigate to your desired location on your computer and save the document.
-
-
If you'd prefer a hard copy of the Report, this is the option for you.
-
Select the blue 'Print' button in the Print Student Reports window
A dialog box will appear, in which you can choose your print settings.
-
Select your print settings
-
Click the 'Print' button
-
Back to top
In addition to saving and printing your Student Reports, there's one more method you might like to try when outputting results from Plickers. It's possible to export a .csv file from your Scoresheet, so that you can work with the results in a spreadsheet program like Microsoft Excel or Google Sheets.
If that sounds like it could be useful, we'd recommend heading over to our next article in this section.
And of course, if there's anything else we can help with, please feel free to get in touch at support@plickers.com, and we'll be very happy to assist.
Comments
0 comments
Article is closed for comments.