As the saying goes, many hands make light work. This is possible when creating content within Plickers, and it's one of the many benefits of using Packs to store your content.
In this article:
To share content privately, and to collaborate on it as a team, our Invite feature is the ideal solution. This article takes you through how to go about doing this.
Private sharing is a feature of Plickers Pro. If you'd rather not upgrade, you might want to consider publishing your Pack instead - click here for more.
Inviting a colleague to a Pack
If you want to kick things off and take on the role of admin, follow the steps below to invite your colleagues to your Pack.
-
Sign in to plickers.com on your laptop/computer
You'll arrive at Your Library (aka the Plickers homepage).
-
Create a new Pack or enter an existing Pack
Click here to find out how to create a new Pack.
To access an existing Pack, you can select it from your left-hand sidebar at plickers.com. You'll be taken to your Pack page, and you can see an example of what this looks like in the next step.
-
Select the blue 'Invite' button in the right-hand sidebar
The location of the button is shown below:
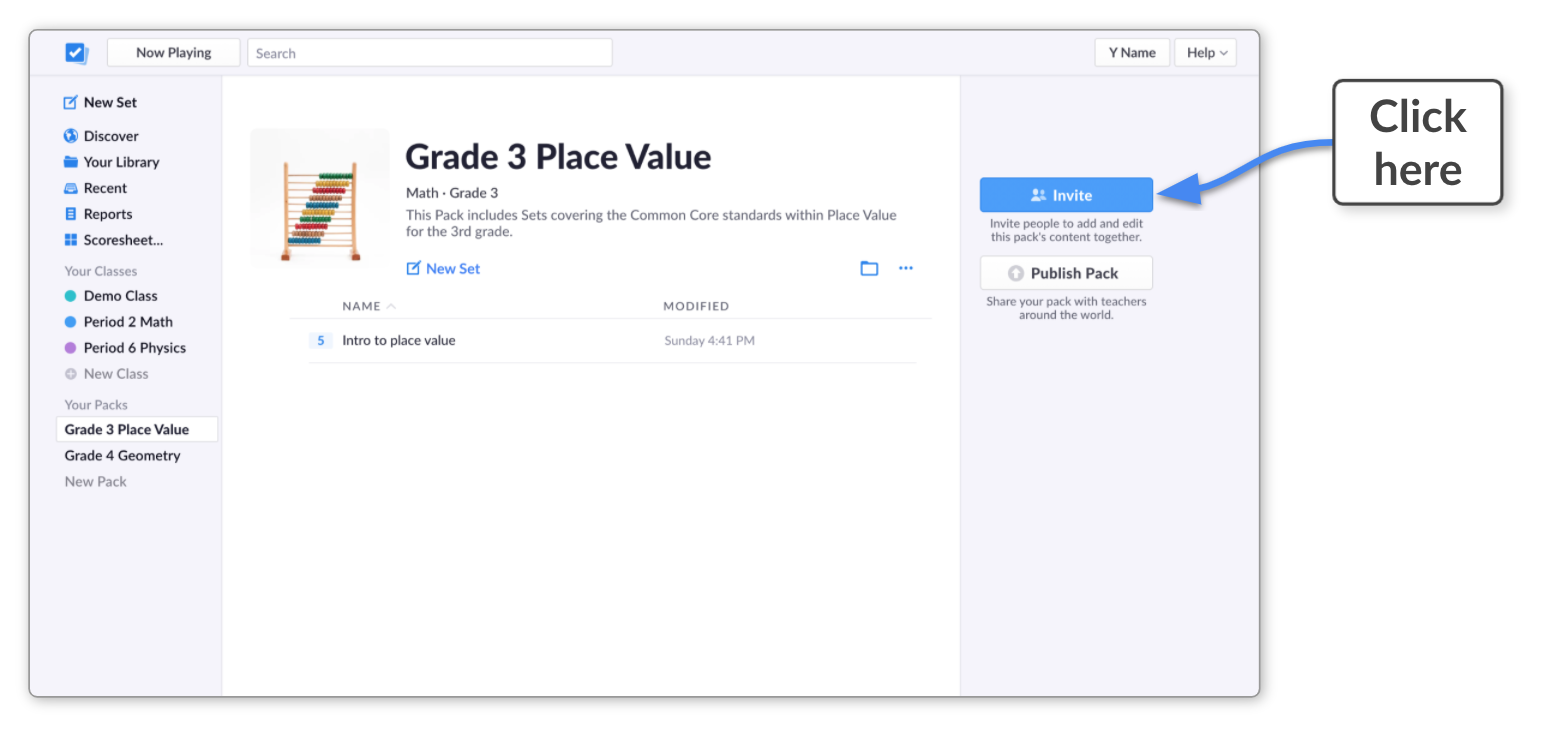
The Invite dialog box will appear (the next step will demonstrate what this looks like), and you'll notice your details with your admin status displayed.
-
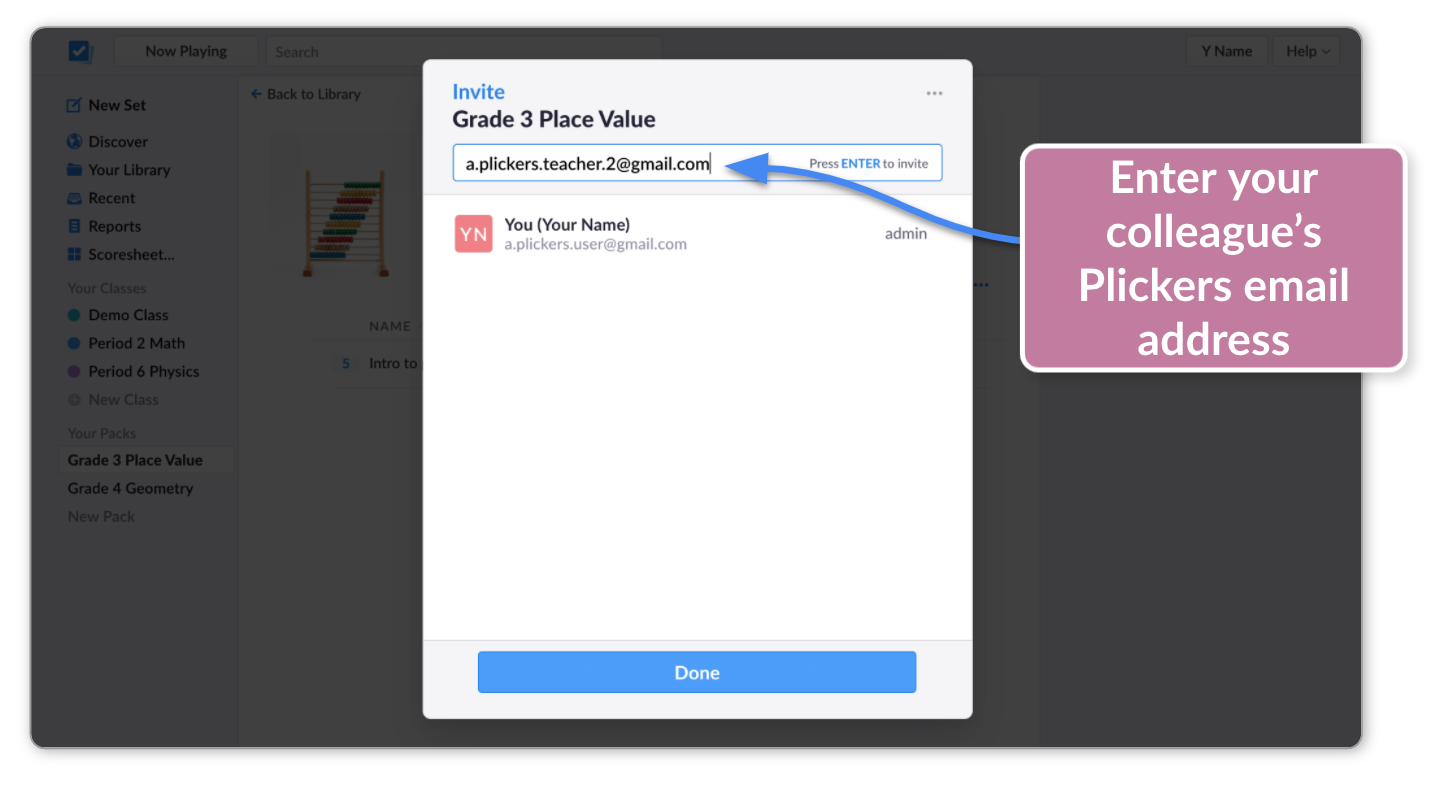
Enter the email address of the Plickers teacher you'd like to collaborate with
As indicated below:
 Note
NoteThe email address must be linked to a Plickers account. Your colleague will receive an invite notification within the Plickers account linked to the email address you enter.
-
Hit Enter
You'll see your colleague's information appear (as shown in the next step).
-
Choose whether to allow your colleague to edit or view the Pack
Do this by selecting the dropdown menu adjacent to their email address, as shown below:
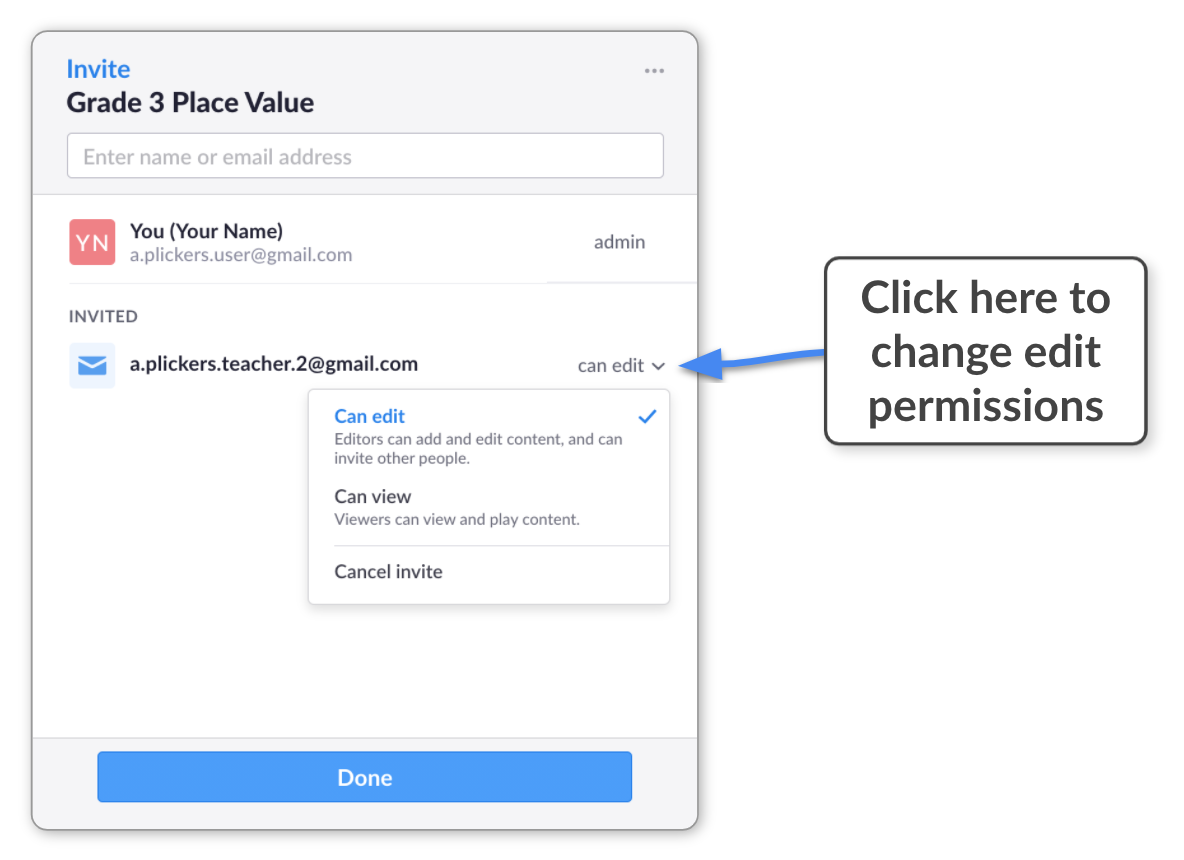
You can elect to give them edit access, or view (read-only) access.
More infoFor more information on the user permissions available, head over to our Explore article here.
-
If required, repeat steps 4 to 6 to invite more colleagues
-
Click the blue 'Done' button
Your colleague will see an invite pop up in their Plickers account, inviting them to join the Pack. More info on this is available in the next section.
You can change who has access to a Pack at any time (if you are the admin or an editor). Simply click on the blue Invite button in the right-hand sidebar of your Pack page, and make the changes from there.
Back to top
Accepting an invite to a Pack
If a colleague has mentioned that they want to invite you to collaborate on their Pack, here's what you can expect.
-
Sign in to plickers.com on your laptop/computer
You'll arrive at Your Library (aka the Plickers homepage).
-
Ensure you're signed up to Plickers Pro
You can find out more information about Plickers Pro here. Remember that you can try Plickers Pro for free for 14 days.
-
Click on the Pack with a red dot in your left-hand sidebar
You'll have noticed a new Pack showing up in your account with a red dot next to it, just like the below:
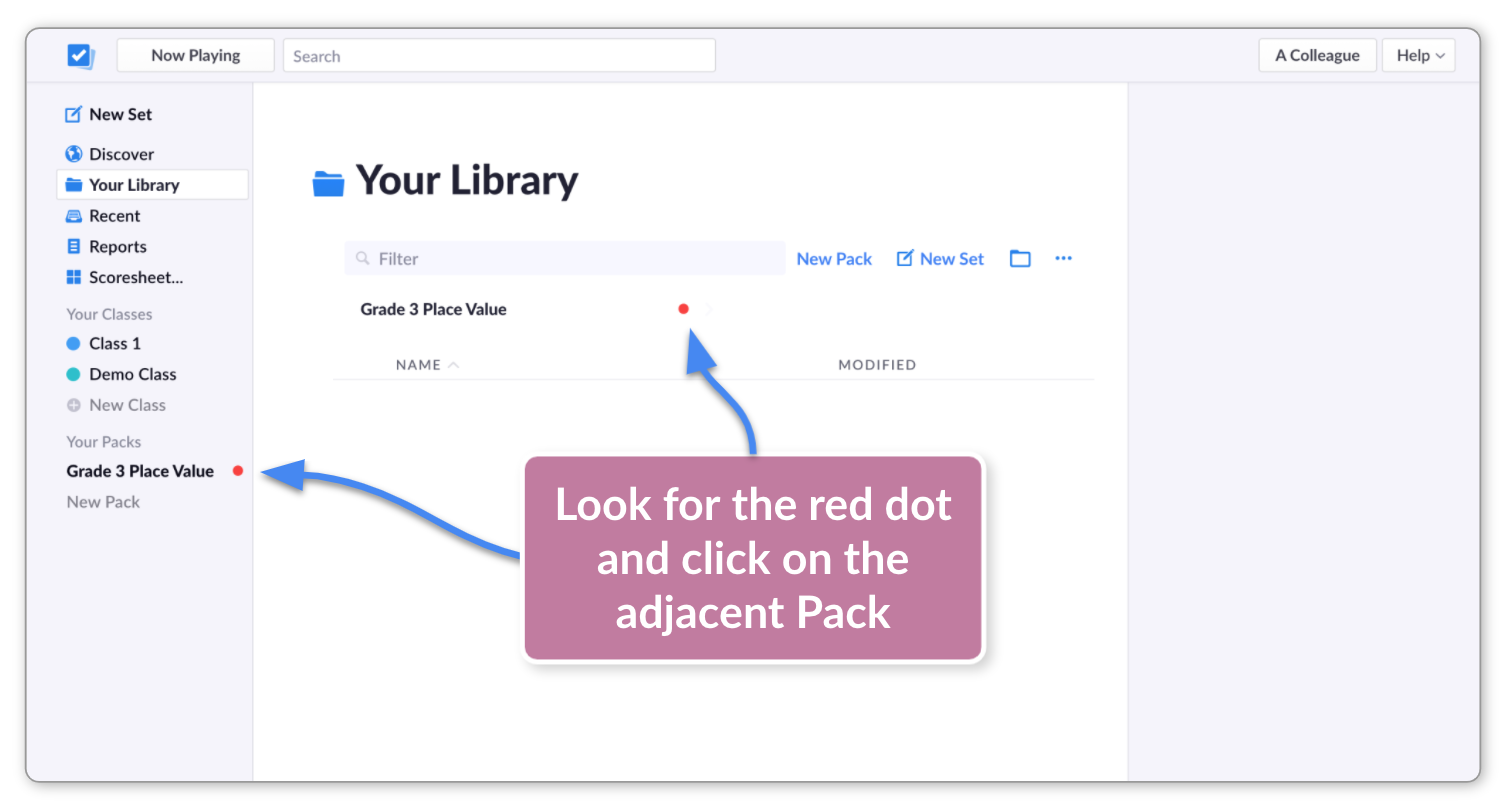
The red dot signifies that you have been invited to join that Pack. When you click on the Pack name, you'll be taken to the Pack page.
-
Click the blue 'Join Pack' button at the bottom of the Pack page
The notification looks like this:

After clicking Join Pack, you'll be able to interact with that Pack, depending on your edit privileges.
You'll be sent an email to notify you that you've been invited to a Pack. You can also join the Pack by clicking on the link in that email.
The shared Packs that you’ve joined will be included alongside your own Packs in the left-hand sidebar and at the top of Your Library. In addition, when you use the search bar, you’ll see shared content alongside your own content.
Back to top
Collaborating on a Pack
All those with edit privileges can work on the content within a Pack from their own Plickers account.
It's important to note that when a member of a shared Pack is editing content, other users can view and play the items, but will not be able to edit at the exact same time.
We've gone into more detail about what to expect from collaborating within a Pack in our Explore article here.
Be careful when editing, deleting or moving items out of shared Packs. Changes will affect content in other users’ Class Queues, and their ability to use the items in general. There's more info available here.
Back to top
Leaving a privately shared Pack
If you're moving on to a new role, you may be considering leaving a shared Pack. Here's how to do so:
-
Sign in to plickers.com on your laptop/computer
You'll arrive at Your Library (aka the Plickers homepage).
-
Select your Pack from the left-hand sidebar
You'll be taken to your Pack page.
-
Click the 3-dot icon
 towards the right of the page
A menu will appear (the next step includes a screenshot demonstrating this).
-
Select 'Leave Pack'
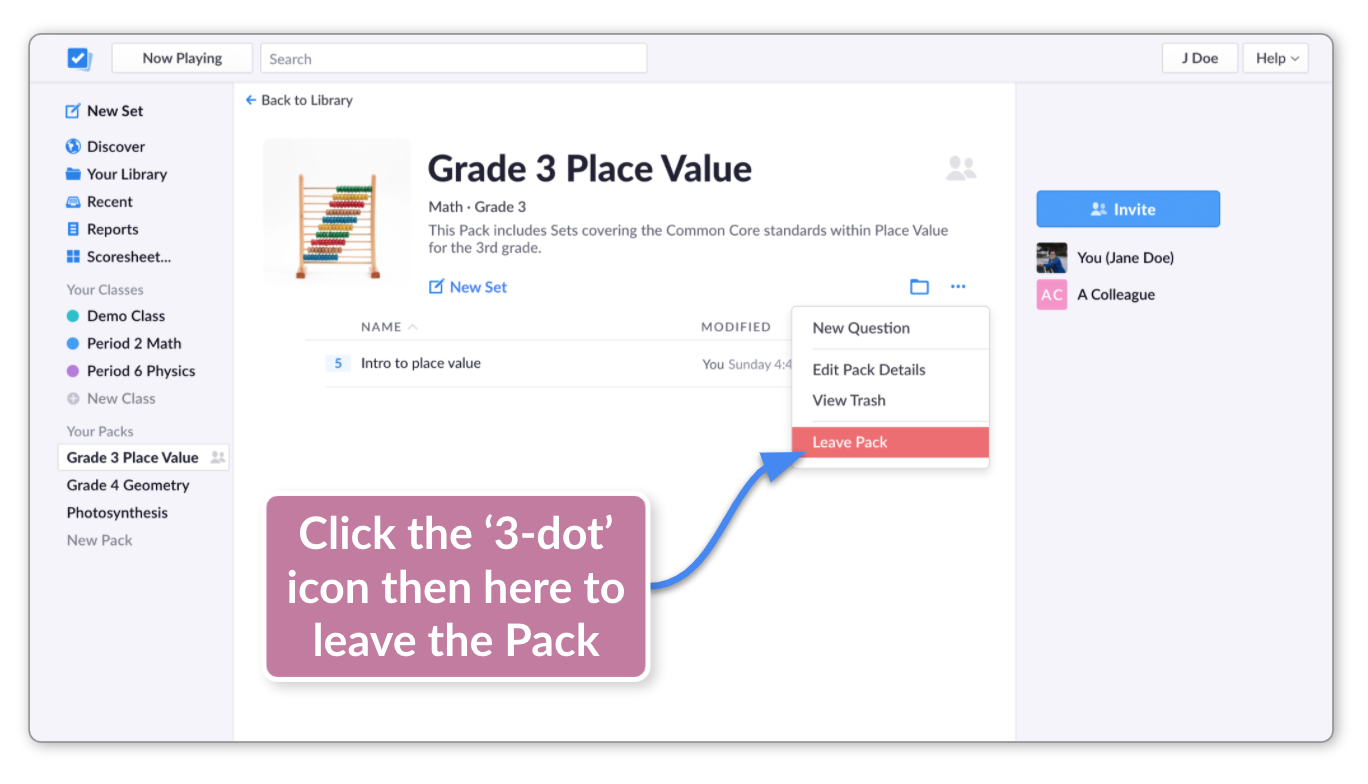
A dialog box will appear, asking you to confirm.
-
If you're sure, click 'Yes, I want to leave'
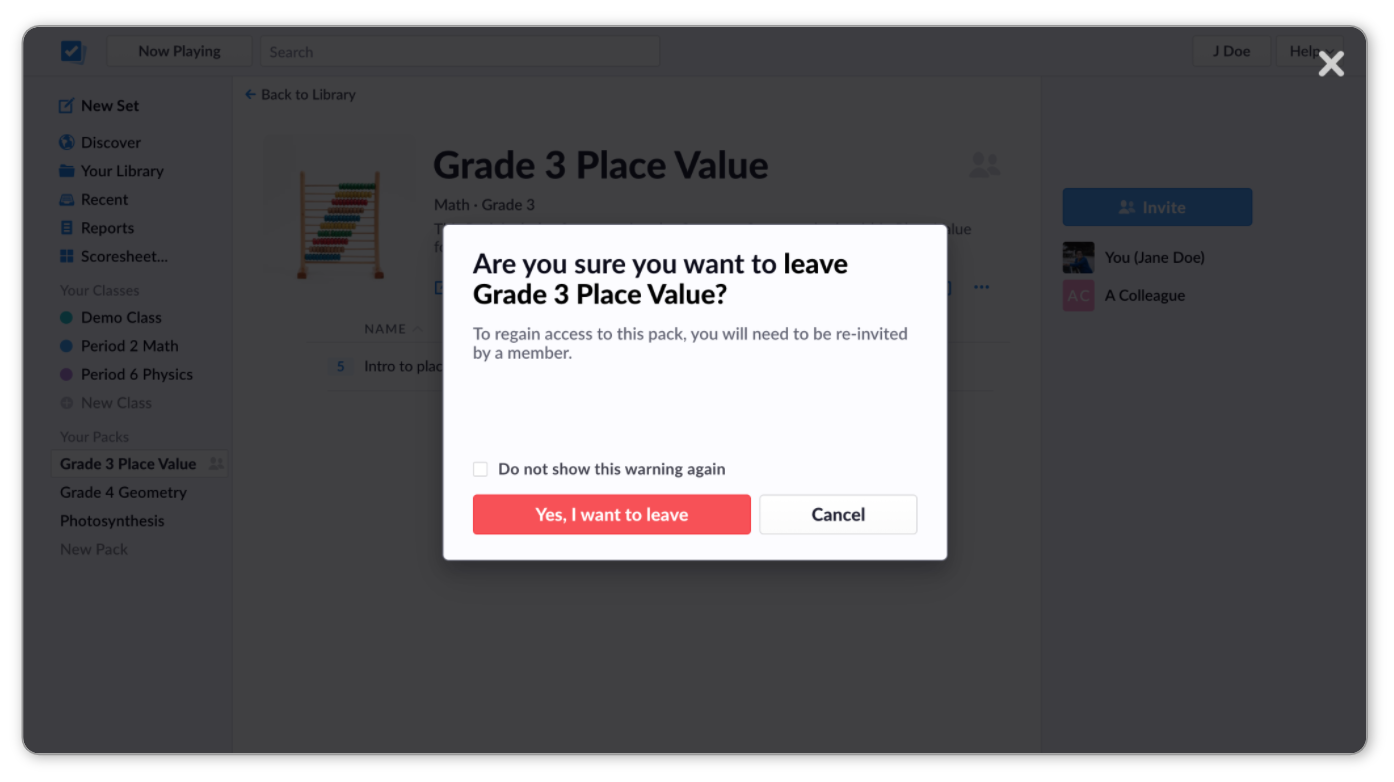
You'll go back to Your Library, and the Pack will no longer be listed in your left-hand sidebar. You won't have access to it for future sessions, but you'll keep past student results from that Pack in your Reports and Scoresheets.
There are certain ramifications for leaving a Pack, especially if you are an admin. Please click here to find out more.
Comments
0 comments
Article is closed for comments.