This guide assumes you have already moved through the initial order process. If you would like to know more, feel free to browse through our dedicated guide linked here.
Thank you so much for your order - we really appreciate your support!
In this article we first go through the order confirmation process. Then, we'll take you through the steps involved in managing your order and distributing your Pro memberships.
In this article:
Order Confirmation
Please select the appropriate toggle box below:
-
If you used schools.plickers.com to create an order, you'll automatically receive two emails.
One will contain instructions on how to start distributing memberships to your colleagues (to find out more, please see the next section here in this article).
The other email will include a link to your invoice and payment page.
-
After requesting a quote through schools.plickers.com, you'll be sent an email with the pdf document of your quote attached.
In that email, you'll see a link to follow if you would like to accept the quote and move forward with the order process.
That link will take you to a page where you can confirm your invoicing details, and upload your purchase order (if you have one).
Finally, upon selecting 'Purchase', you'll be sent the two emails referred to in the toggle box above.
If you haven't had a reply from us, please check your spam folder. If there's nothing there either, please contact support@plickers.com.
Using your Order Management Link
The next steps deal with managing your quota of Plickers Pro memberships. There are three tasks featured in the toggle boxes below; the first task is the essential one, so it's best to read through these in order:
-
To allocate memberships to teachers and colleagues within your organization...
-
Select the blue 'View Order' button in your order confirmation email
The subject of the email is 'Plickers for Schools Order Confirmation & Access Instructions'.
When you select the blue 'View Order' button, you'll be taken to your Order Management Page.
-
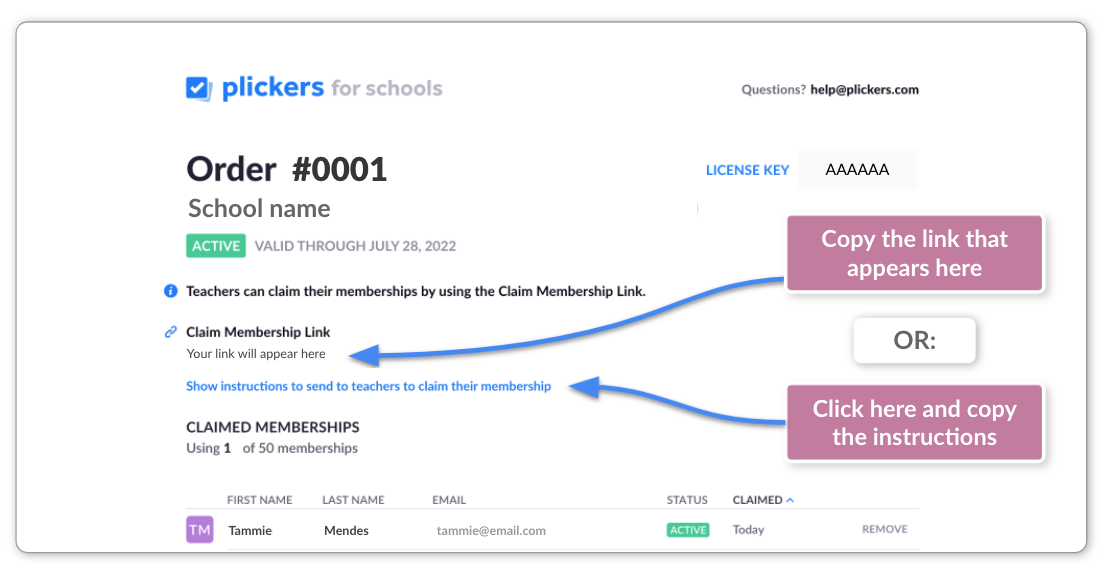
In your Order Management Page, copy the Claim Membership Link
If you hover over the link, you'll see a button to Copy to clipboard.
You can also try clicking Show instructions to send to teachers to claim their membership. This will reveal a template message that you can copy into an email.
-
Paste the link (or template message) into an email
-
Send the email to your colleagues upgrading to Pro
All they'll need to do then is click on the membership link.
Note that the membership link only works if a user is signed in to their Plickers account. So please ask your colleagues to make sure of the following before they click:
- Those already with Plickers accounts should make sure they are signed in to the account that they wish to be upgraded to Pro
- Those who have not used Plickers before will need to first create a Plickers account at plickers.com/signup. They should then remain signed in when they click the link
More infoIf preferred, teachers can choose to enter the license key (also provided in the template message) in their Plickers account. They'll just need to go to plickers.com/account and select Add License Key.
-
-
If you scroll down a little on your Plickers Pro for Schools order management page, you'll find a section that displays how many teachers have joined your order and upgraded to Pro (look for the Claimed Memberships heading).
-
Use the counter and progress bar to see how many memberships remain
-
Browse the table to manage the memberships of those who have signed up
TipYou can click on the column headings to sort the table by each different variable.
-
-
A situation may arise in which you'll need to remove a teacher from your membership quota, for instance if they retire or change schools. To do so, you'll use the table (referred to in the toggle box above) in the following way:
-
Access your Plickers Pro for Schools order management page
-
Find the name of your colleague
-
Click the 'Remove' button adjacent to their name on the right-hand side
-
Send the membership link to another teacher to fill the place again
See the first toggle box above for more info on how to do this.
-
And that should be everything you need to know about managing your Plickers Pro memberships for your colleagues.
We also have a dedicated guide for teachers on how to upgrade their account using a membership link or license key. If it's helpful for your colleagues, you can guide them to this link.
And of course, if you have any questions, please don't hesitate to get in touch at support@plickers.com. We'll be more than happy to assist with anything at all.
Comments
0 comments
Article is closed for comments.