Flash guide
- In the Editor at plickers.com, navigate to your question prompt or answer choice
- Click the audio icon in the right-hand toolbar, or click Add Media Choices and select the audio icon from there
- Use the Sound Library to find an audio clip, or upload a file from your own computer, or record your audio right there in the Editor
- Make any edits you need (more info here), and select Done
Adding a sound clip to your question or answer choices is a great way to jazz up your Plickers sessions and increase student engagement. It also makes Plickers even more accessible for all the music and language teachers out there!
In this article:
This article will guide you through the three possible routes to include an audio file when creating your content in the Editor.
You can access the Editor at plickers.com on your computer by creating a new Set or double-clicking the title of an existing content item in Your Library. For more details, click here.
Option 1: Record your own sounds within Plickers
Using our in-built sound recorder, it's quick and easy to insert your own audio into your question slides on the spot.
For as long as they remain in your Sets, your sounds will also be stored in your Sound Library, for easy access when writing future questions. See the Sound Library section below for more info about this in particular.
When you record your first sound, you'll be prompted by your browser to allow Plickers to use your microphone. If you miss the prompt and need to do this manually, click here to find out how.
Select the appropriate toggle box below to see the steps required:
-
-
Access the Editor at plickers.com
To find out more, check out our Editor article linked here.
-
Select the Sound Clip icon
 in the Media Toolbar on the right
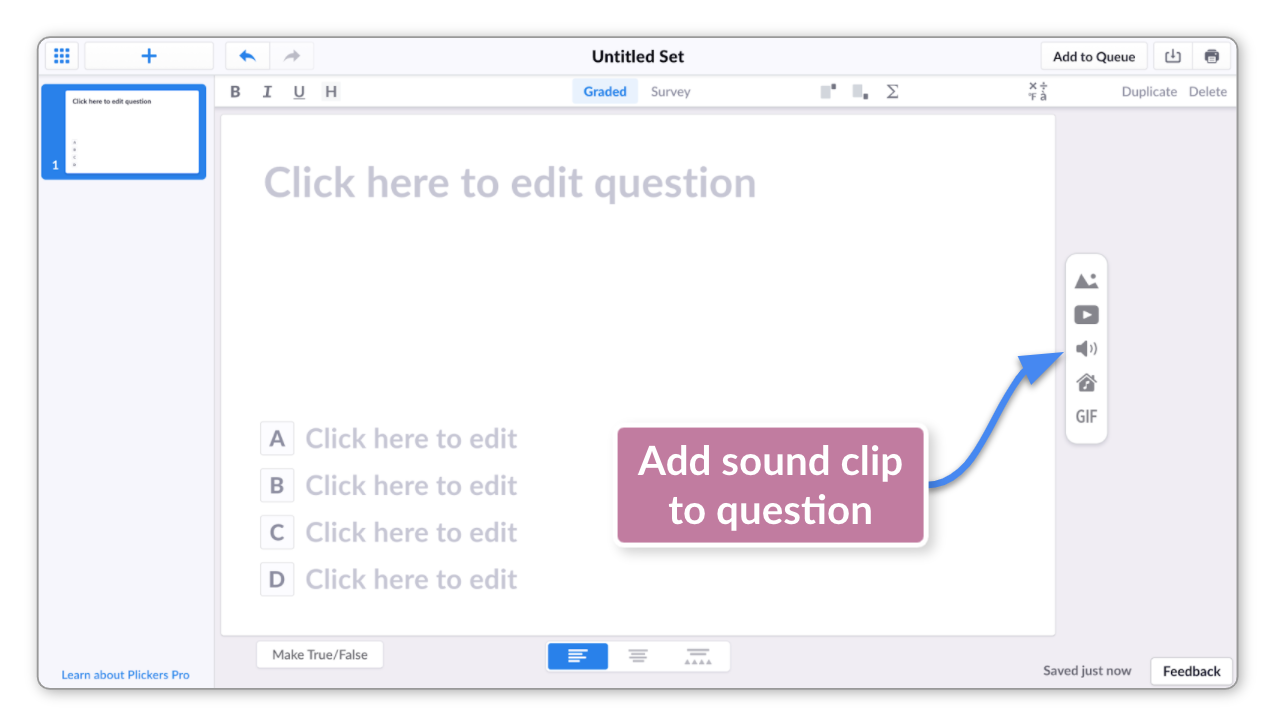
-
Select the large blue Record button
The button contains a microphone icon
 and is located right in the middle of the screen, as shown below:
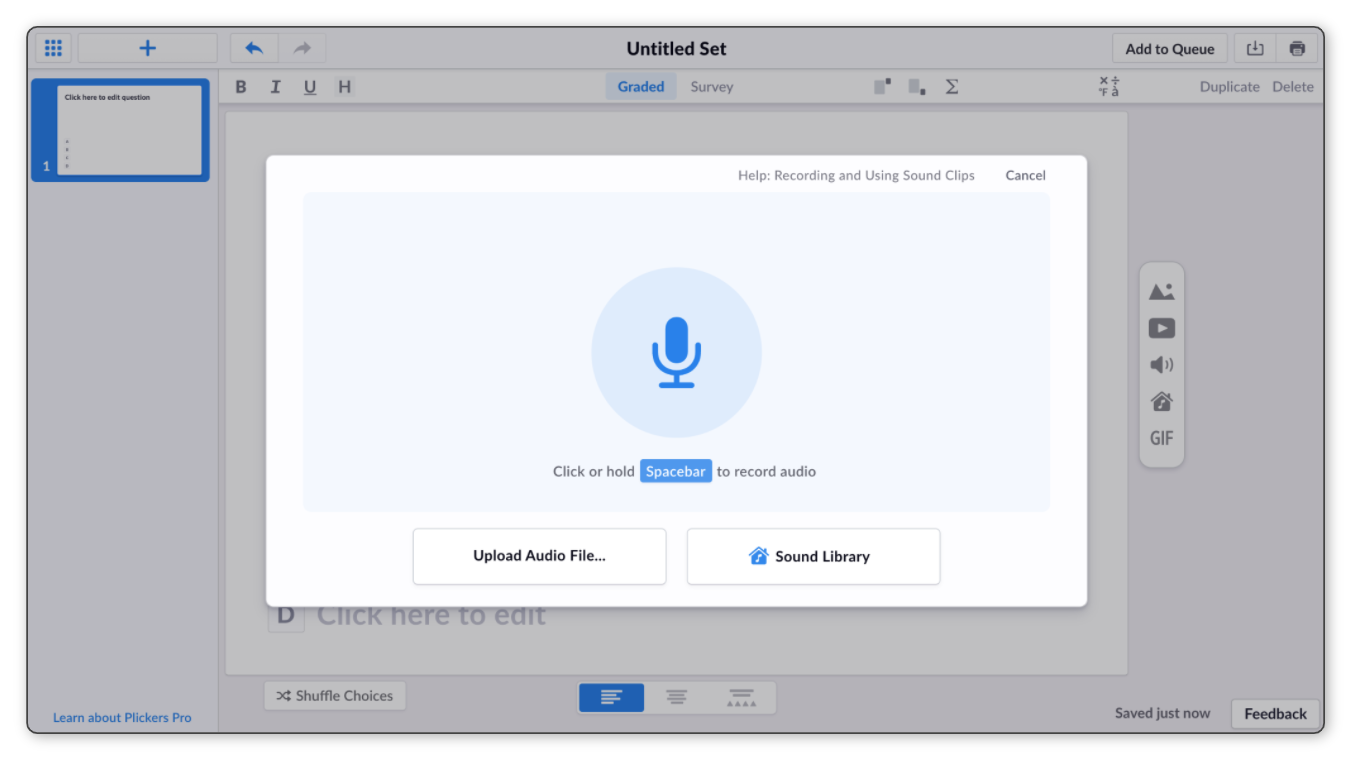
As soon as you select the button, recording will begin and you can start your audio.
TipYou can also hold down spacebar to record - this is useful if you just want to record for a few seconds.
-
Review your recording
You'll arrive at the following window:
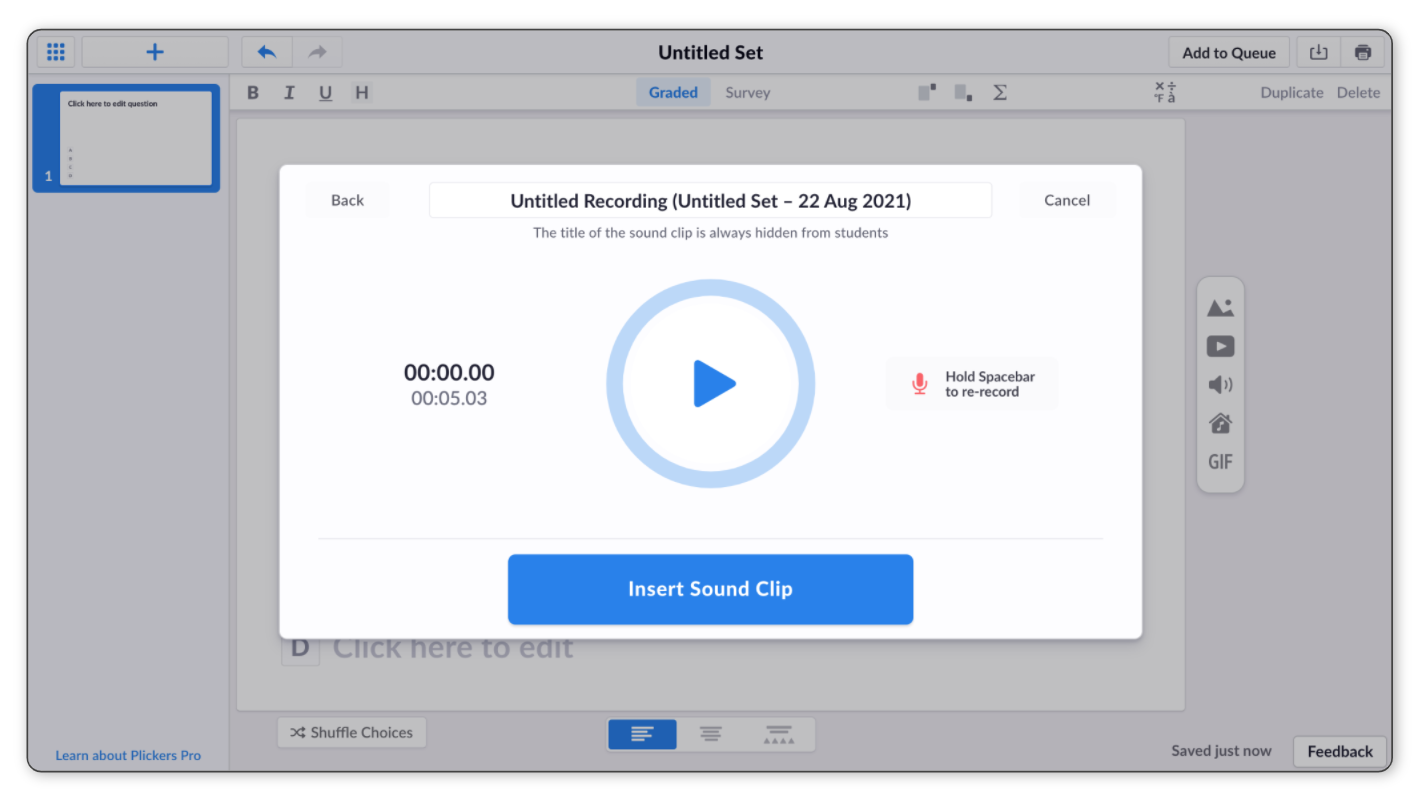
Click on the Play button to listen back to your recording.
If you're not happy with it, you can re-record by clicking the 'Record again' button on the right, or by holding down the spacebar. Alternatively, select the Back button in the top left corner.
-
Name your recording
Use the text box at the top of the screen shown above to give your recording a name (don't worry, this won't be displayed to your students when you play your content in class).
This will help you to stay organized and it saves time when searching for past audio clips in the Sound Library.
-
Insert your recording
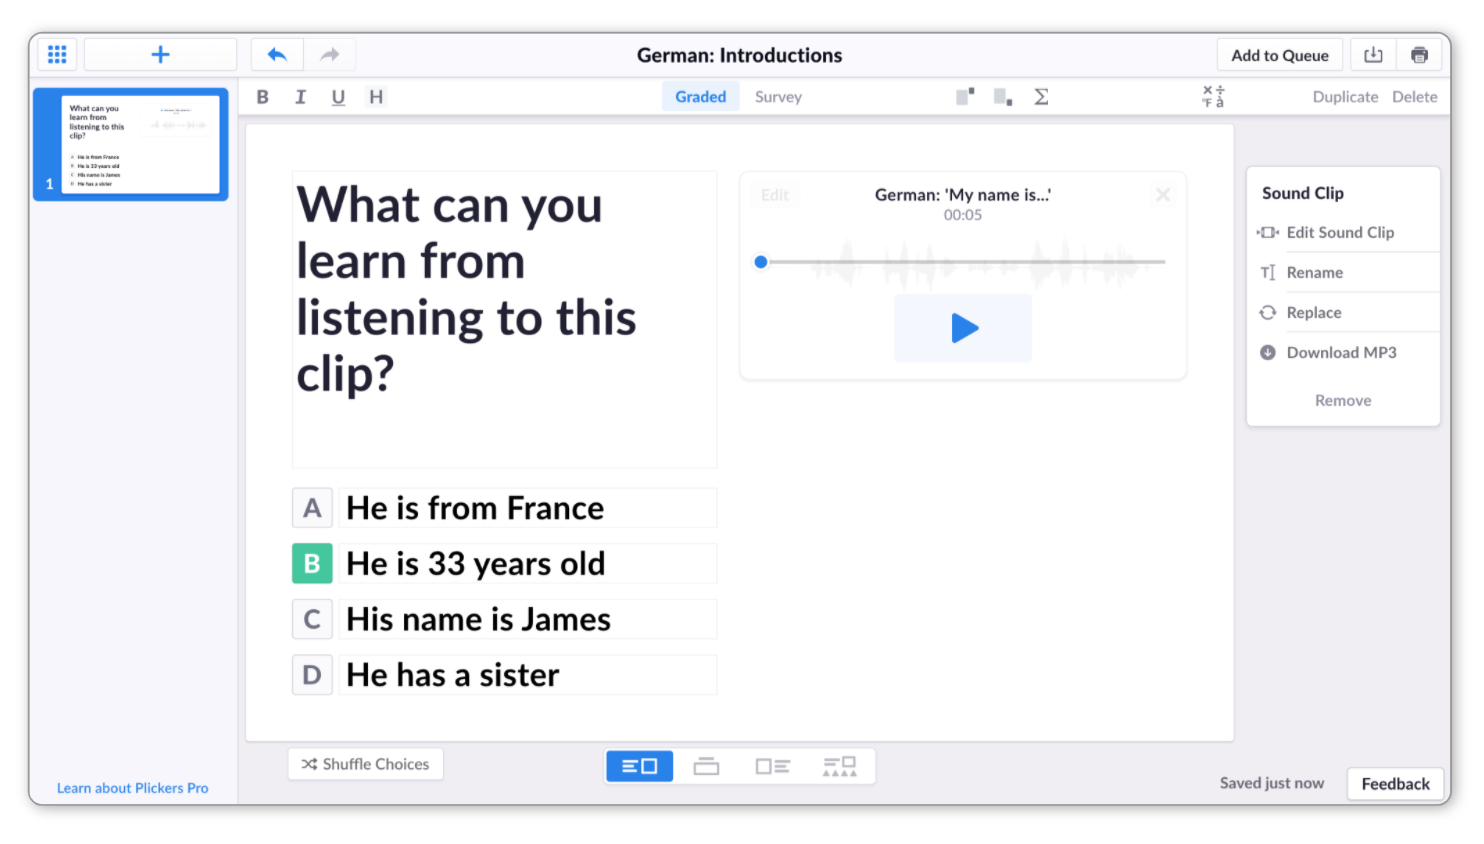
Click on the blue Insert Sound Clip button. Your recording will then show up next to your question prompt, just like in the screenshot below:
More infoOnce you've inserted your sound file, you can go back and edit it by selecting Edit Sound Clip in the toolbar on the right. To find out more about this, follow this link.
Back to top
-
-
The process of recording sounds for your answer choices is very similar to that for question prompts. The only difference is how to reach the audio interface, but we've included the whole process below for convenience.
-
Access the Editor at plickers.com
To find out more, check out our Editor article linked here.
-
Select the
 button at the bottom of the screen
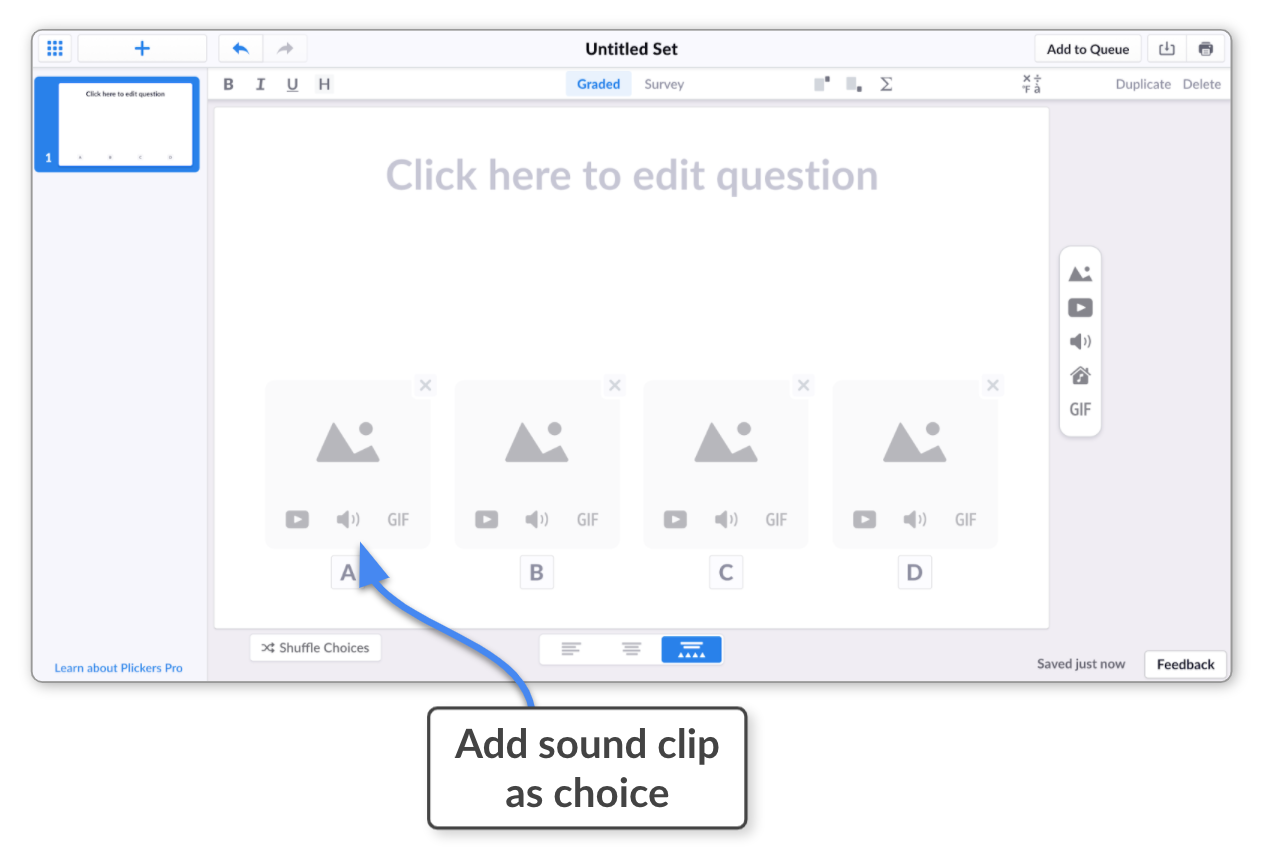
This is the Media Choices button. When you press it, you'll see that the layout of the question slide changes to look like this:
 Tip
TipYou can also reach this page setup by hovering your cursor over an answer choice and selecting the Add Media Choices button that appears on the right.
-
Click on the Sound Clip icon
within your choicesLet's say you want to record a sound for choice A. If you click on the button shown below, you'll be taken to the Add Sound interface, where you'll be able to make your recording.
-
Select the large blue Record button
The button contains a microphone icon
and is located right in the middle of the screen, as shown below:As soon as you select the button, recording will begin and you can start your audio.
TipYou can also hold down spacebar to record - this is useful if you just want to record for a few seconds.
-
Review your recording
You'll arrive at the following window:
Click on the Play button to listen back to your recording.
If you're not happy with it, you can re-record by clicking the 'Record again' button on the right, or by holding down the spacebar. Alternatively, select the Back button in the top left corner.
-
Name your recording
Use the text box at the top of the screen shown above to give your recording a name (don't worry, this won't be displayed to your students when you play your content in class).
This will help you to stay organized and it saves time when searching for past audio clips in the Sound Library.
-
Insert your recording
Click on the blue Insert Sound Clip button. Your recording will then show up as your answer choice, just like in the screenshot below:
You'll then be free to record sound clips for the remaining answer choices by repeating the process above for choices B-D.
More infoYou can go back and edit your audio clip by hovering your cursor over the answer choice and selecting the Edit button in the top-left corner. To find out more about this, follow this link.
Back to top
-
Option 2: Upload audio files from your computer
If you've got a sound clip that you'd like to add from your own collection, just like with images it's also possible to upload audio files from your computer.
Select the appropriate toggle box below to see the steps required:
-
Here's how to upload a file to support your question:
-
Access the Editor at plickers.com
To find out more, check out our Editor article linked here.
-
Select the Sound Clip icon
in the Media Toolbar on the right -
Select 'Upload Audio File...'
It's located towards the bottom of the window - you can see it in the image below:
You'll be directed to your computer's Explorer or Finder window, where you can locate your file.
-
Select your desired file from your computer
It'll be inserted to the right of your question prompt in the Editor, like in the image below:
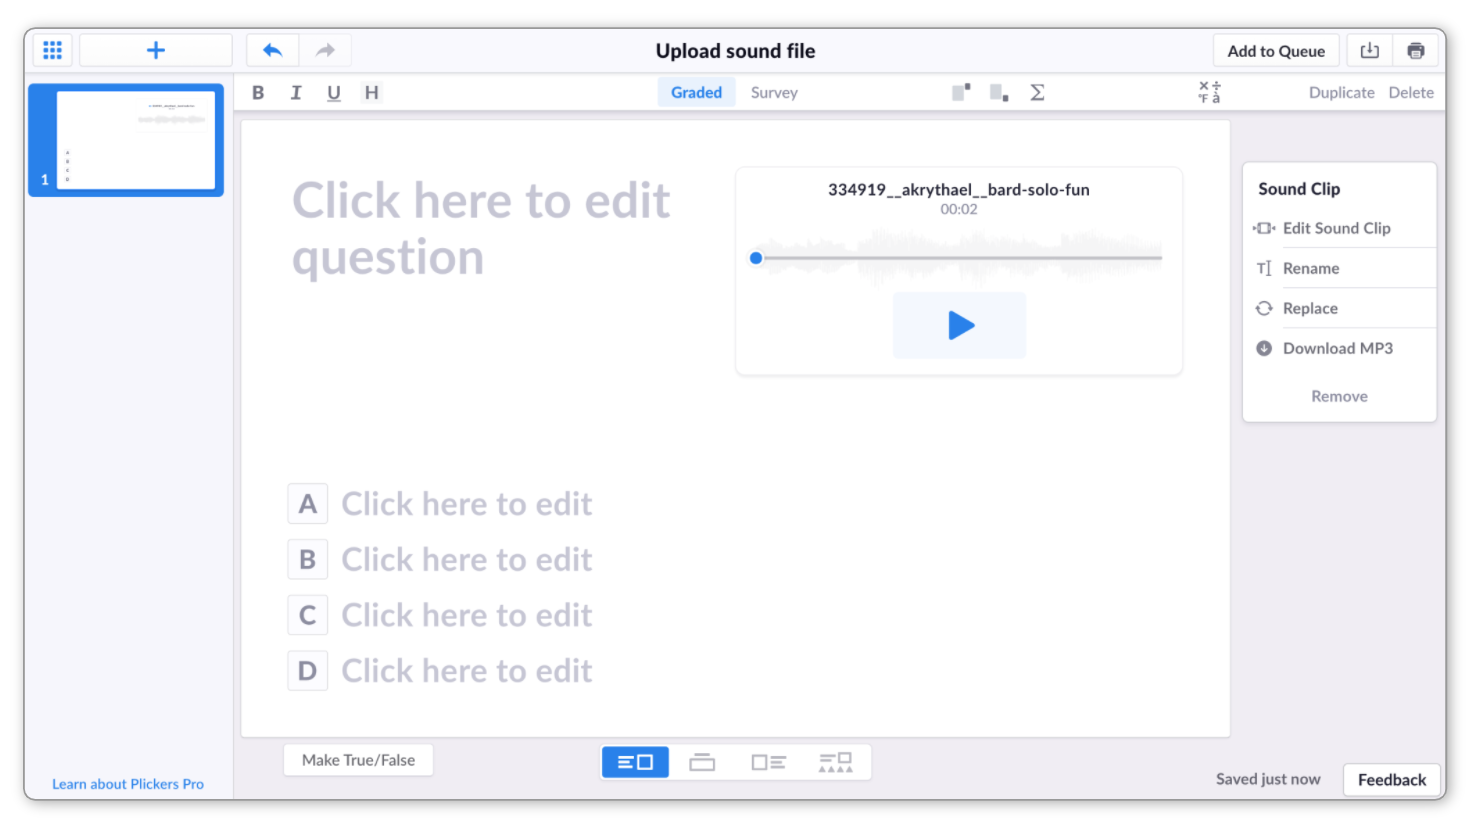
More infoOnce you've inserted your sound file, you can go back and edit it by selecting Edit Sound Clip in the toolbar on the right. To find out more about this, follow this link.
Back to top
-
-
The process of uploading sound clips for your answer choices is very similar to that for question prompts. The only difference is how to reach the audio interface, but we've included the whole process below for convenience.
-
Access the Editor at plickers.com
To find out more, check out our Editor article linked here.
-
Select the
button at the bottom of the screenThis is the Media Choices button. When you press it, you'll see that the layout of the question slide changes to look like this:
TipYou can also reach this page setup by hovering your cursor over an answer choice and selecting the Add Media Choices button that appears on the right.
-
Click on the Sound Clip icon
within your choicesLet's say you're working with choice A. If you click on the button shown below, you'll be taken to the Add Sound interface, where you can upload your file.
-
Select 'Upload Audio File...'
It's located towards the bottom of the window - you can see it in the image below:
You'll be directed to your computer's Explorer or Finder window, where you can locate your file.
-
Select your desired file from your computer
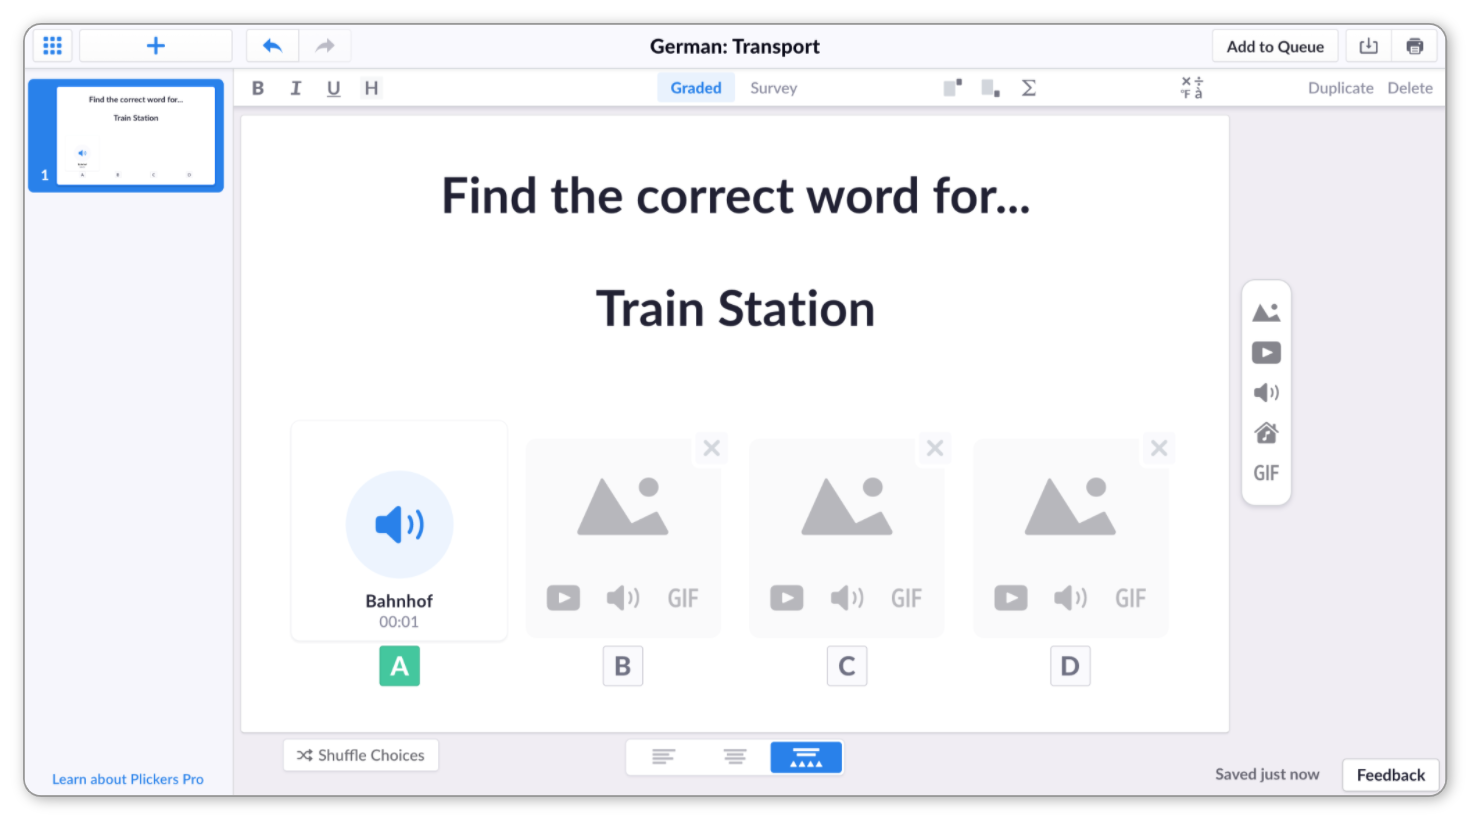
It'll be inserted so that it fills choice A, as shown in the image below:
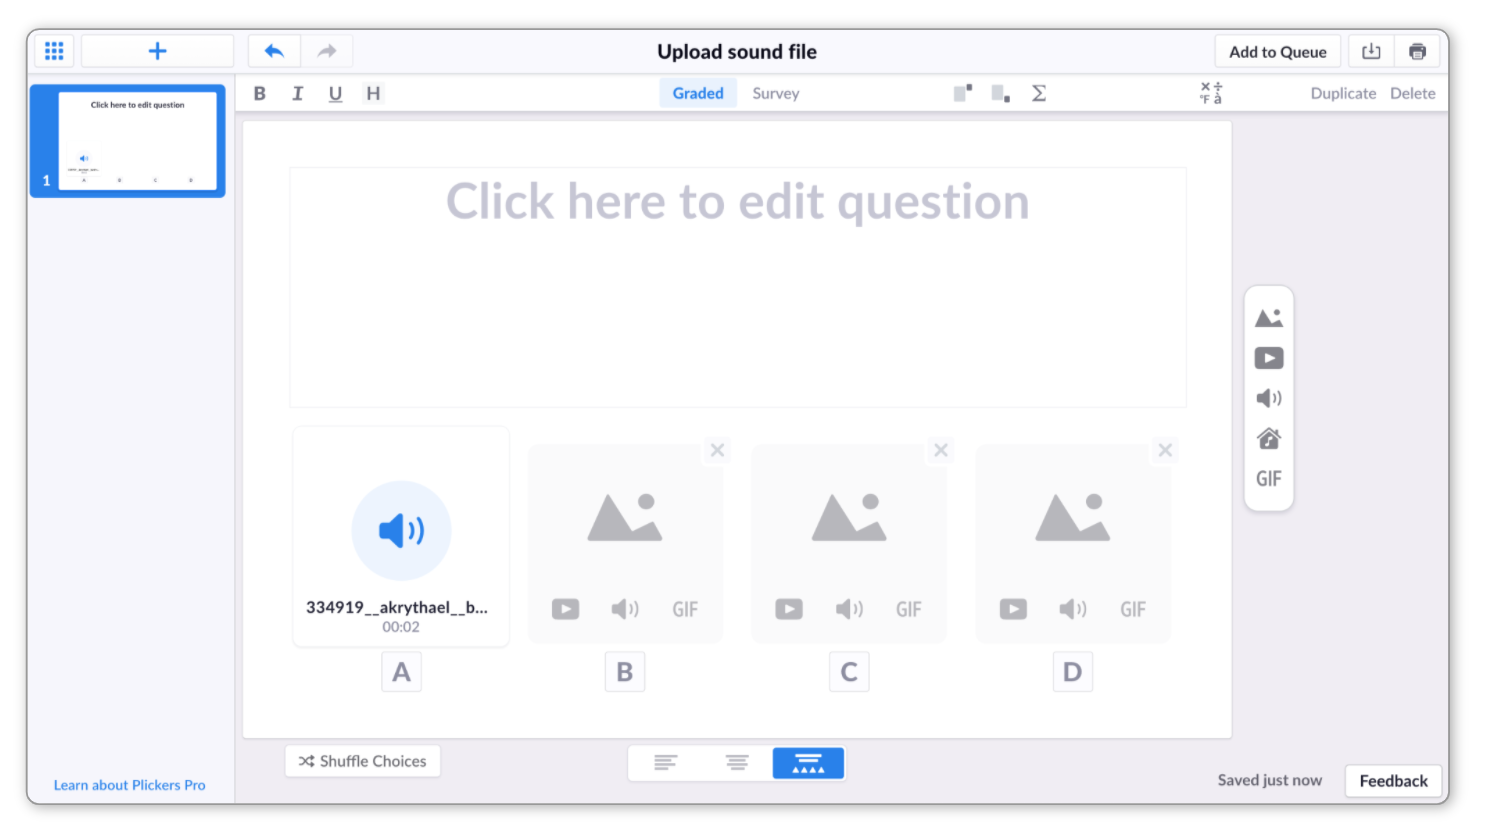
More infoYou can go back and edit your audio clip by hovering your cursor over the answer choice and selecting the Edit button in the top-left corner. To find out more about this, follow this link.
Back to top
-
Option 3: The Sound Library
When adding an audio file to your Plickers content, you may notice an additional feature called the Sound Library, which contains a range of audio clips for you to search through and use in your questions.
For more information about what the Sound Library is, feel free to browse through our Explore article linked here, but for now we'll take you through how to use it when writing your Plickers content.
Select the appropriate toggle box below to see the steps required:
-
Let's go through how to use the Sound Library to add audio files to support your question.
-
Access the Editor at plickers.com
To find out more, check out our Editor article linked here.
-
Select the Sound Library icon
 in the Media Toolbar on the right
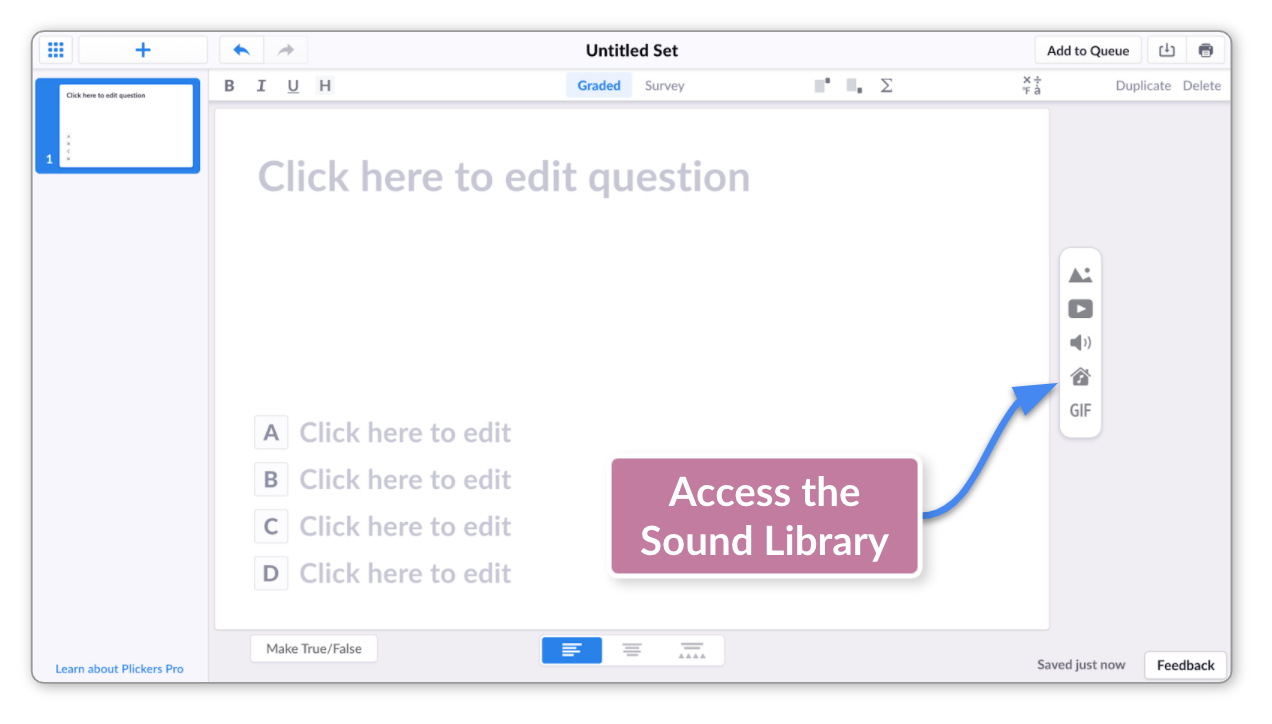
You can also try selecting the Sound Clip icon
and then clicking the Sound Library button in the resulting window. -
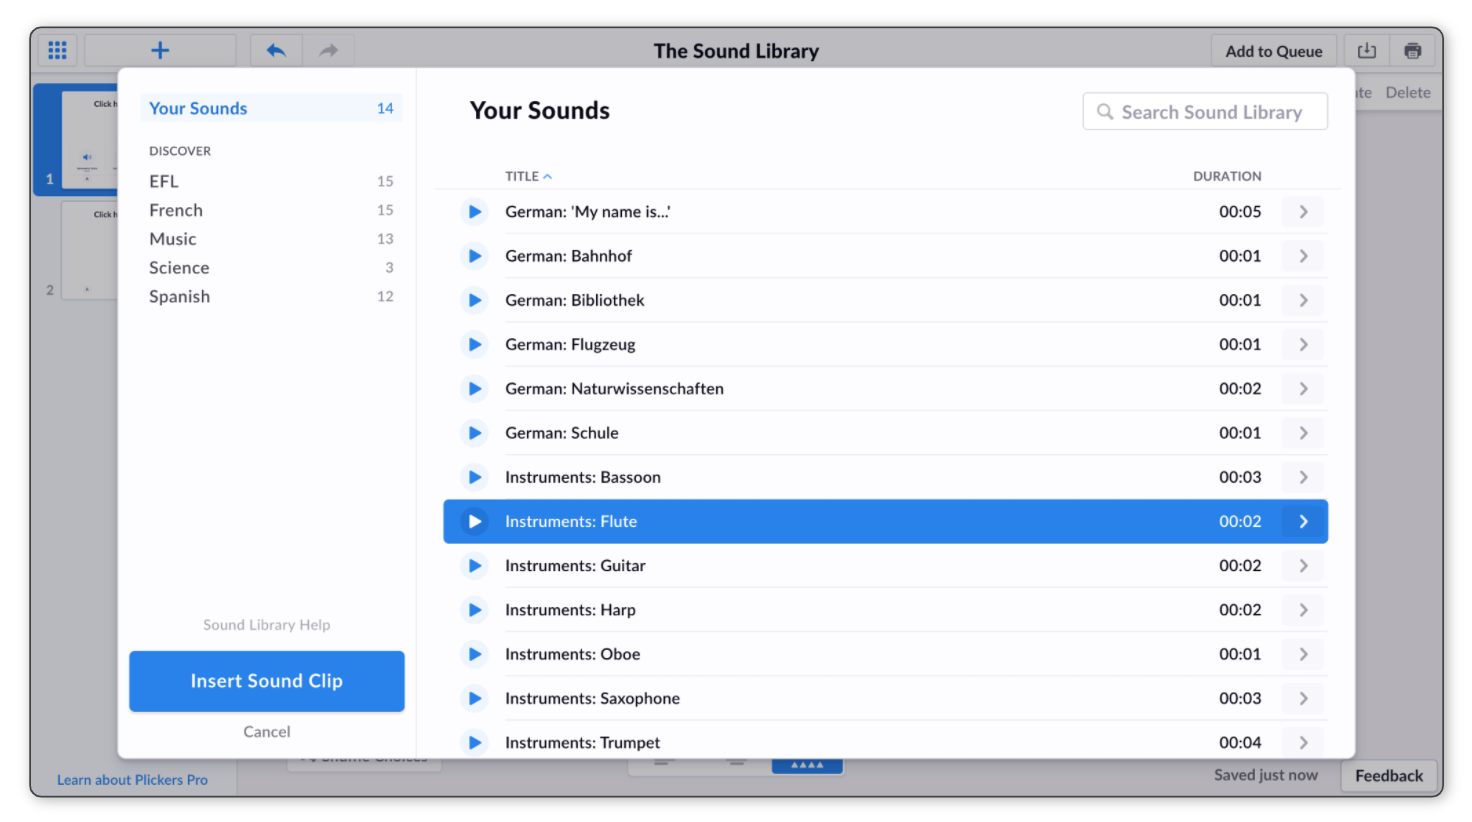
Browse the Sound Library
The image below gives you an idea of what the Sound Library will look like (the contents of Your Sounds will be unique to you).

If you know the title of the sound clip you're looking for, use the Search box in the top right-hand corner. Or you can use the categories in the left-hand sidebar to flick through the sounds available to you.
-
Insert the sound clip
When you click on the title of a sound clip, it'll be highlighted in blue. To insert it into your question slide, select the blue Insert Sound Clip button.
Before you do this, you can choose to either:
- Preview the clip: select the play icon
 to the left of the clip title, or;
 - Edit the clip: select the arrow icon
 to the right of the clip title (check out our How-to Guide linked here for more info)
More infoFor more details on the options you have within the Sound Library, head over to our Explore article linked here.
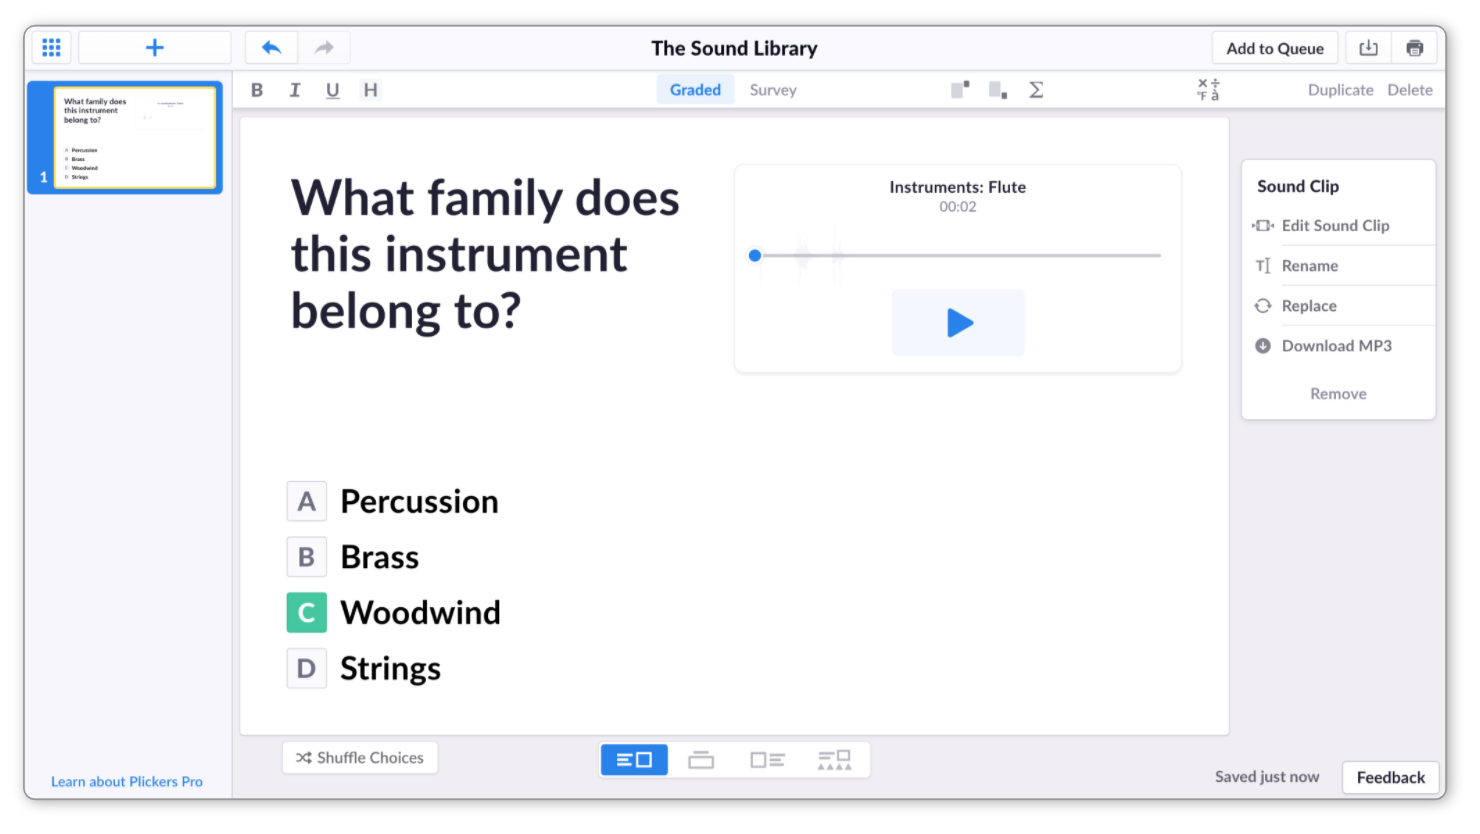
When you insert a sound clip as part of your question, it'll look something like this:
- Preview the clip: select the play icon
Back to top
-
-
As with the other options, the process of using the Sound Library for finding an audio file for your answer choices is very similar to that for question prompts. The only difference is how to reach the interface, but we've included the whole process below for convenience.
-
Access the Editor at plickers.com
To find out more, check out our Editor article linked here.
-
Select the
button at the bottom of the screenThis is the Media Choices button. When you press it, you'll see that the layout of the question slide changes to look like this:
TipYou can also reach this page setup by hovering your cursor over an answer choice and selecting the Add Media Choices button that appears on the right.
-
Click on the Sound Clip icon
within your choicesLet's say you're working with choice A. If you click on the button shown below, you'll be taken to the Add Sound interface.
-
Select the 'Sound Library' button
It's located towards the bottom of the window - you can see it in the image below:
-
Browse the Sound Library
The image below gives you an idea of what the Sound Library will look like (the contents of Your Sounds will be unique to you).
If you know what you're looking for, type your search term into the text box in the top right-hand corner, and press Enter. Or you can use the categories in the left-hand sidebar to flick through the sounds available to you.
-
Insert the sound clip
When you click on the title of a sound clip, it'll be highlighted in blue. To insert it as an answer choice, select the blue Insert Sound Clip button.
Before you do this, you can choose to either:
- Preview the clip: select the play icon to the left of the clip title, or;
- Edit the clip: select the arrow icon to the right of the clip title (check out our How-to Guide linked here for more info)
More infoFor more details on the options you have within the Sound Library, head over to our Explore article linked here.
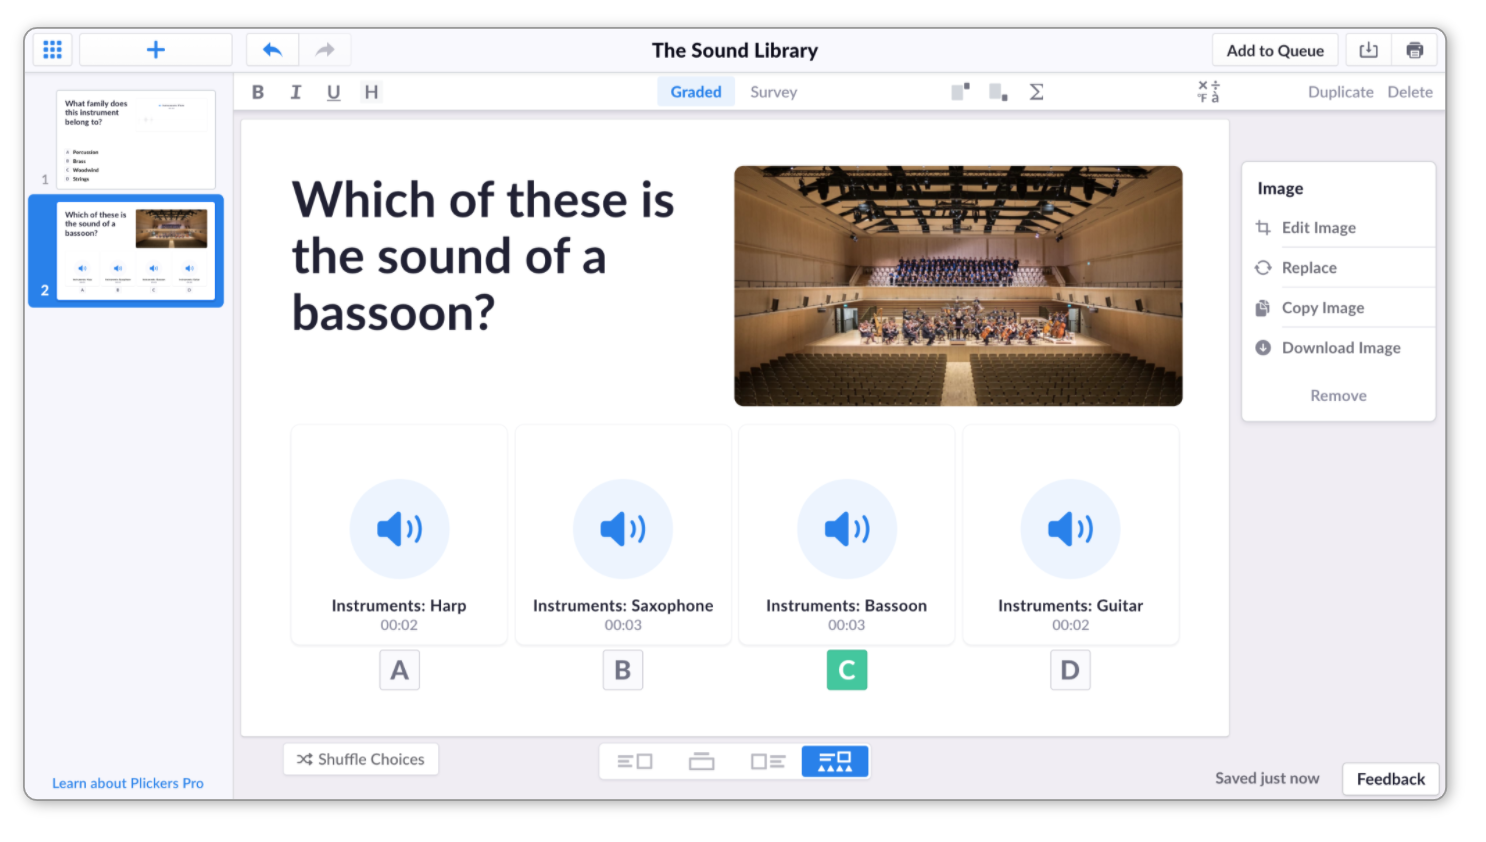
Here's an example of what a question might look like with 4 sound clips inserted from the Sound Library:
 Note
NoteThe file names are only displayed for your benefit, and so won't give away the answer when you play your content in class.
- Preview the clip: select the play icon
Back to top
-
With the ability to record and upload your own audio files, as well as to browse through our Sound Library, we hope that including audio within your Plickers content will be useful for you.
If we can assist further with anything, please don't hesitate to drop us a line at support@plickers.com, and we'll be very happy to help.
Comments
0 comments
Article is closed for comments.