This article assumes you've already created your content, and you're ready to use Plickers in the classroom. If you're not there yet, our Setting Up Plickers Guide will help to get you started.
There are a number of different routes you can take to display your content in class. This guide is here to help you decide which path is best for you.
In this article:
Before we get into details, it's good to keep in mind that, in the classroom, questions will be displayed to your students on your plickers.com web account.
Many Plickers teachers therefore choose to connect their computer to a projector or smartboard, so their questions appear larger and more visible for students.
The Plickers recommendation
We generally recommend using the Plickers mobile app (as opposed to your web account) as much as possible when conducting your session.
The Plickers mobile app can be seen as your in-class remote control, and the Now Playing window on plickers.com as the 'big screen' displaying questions to your students.
With this in mind, our favorite method below is Route 1 (this is the same as the path used in our Using Plickers Getting Started Guide).
Back to top
Which path is best for you?
If you're keen to discover new ways to use Plickers, we've included all the various routes you can use to display questions to your students. To find the path that's right for you, follow the decision tree below...
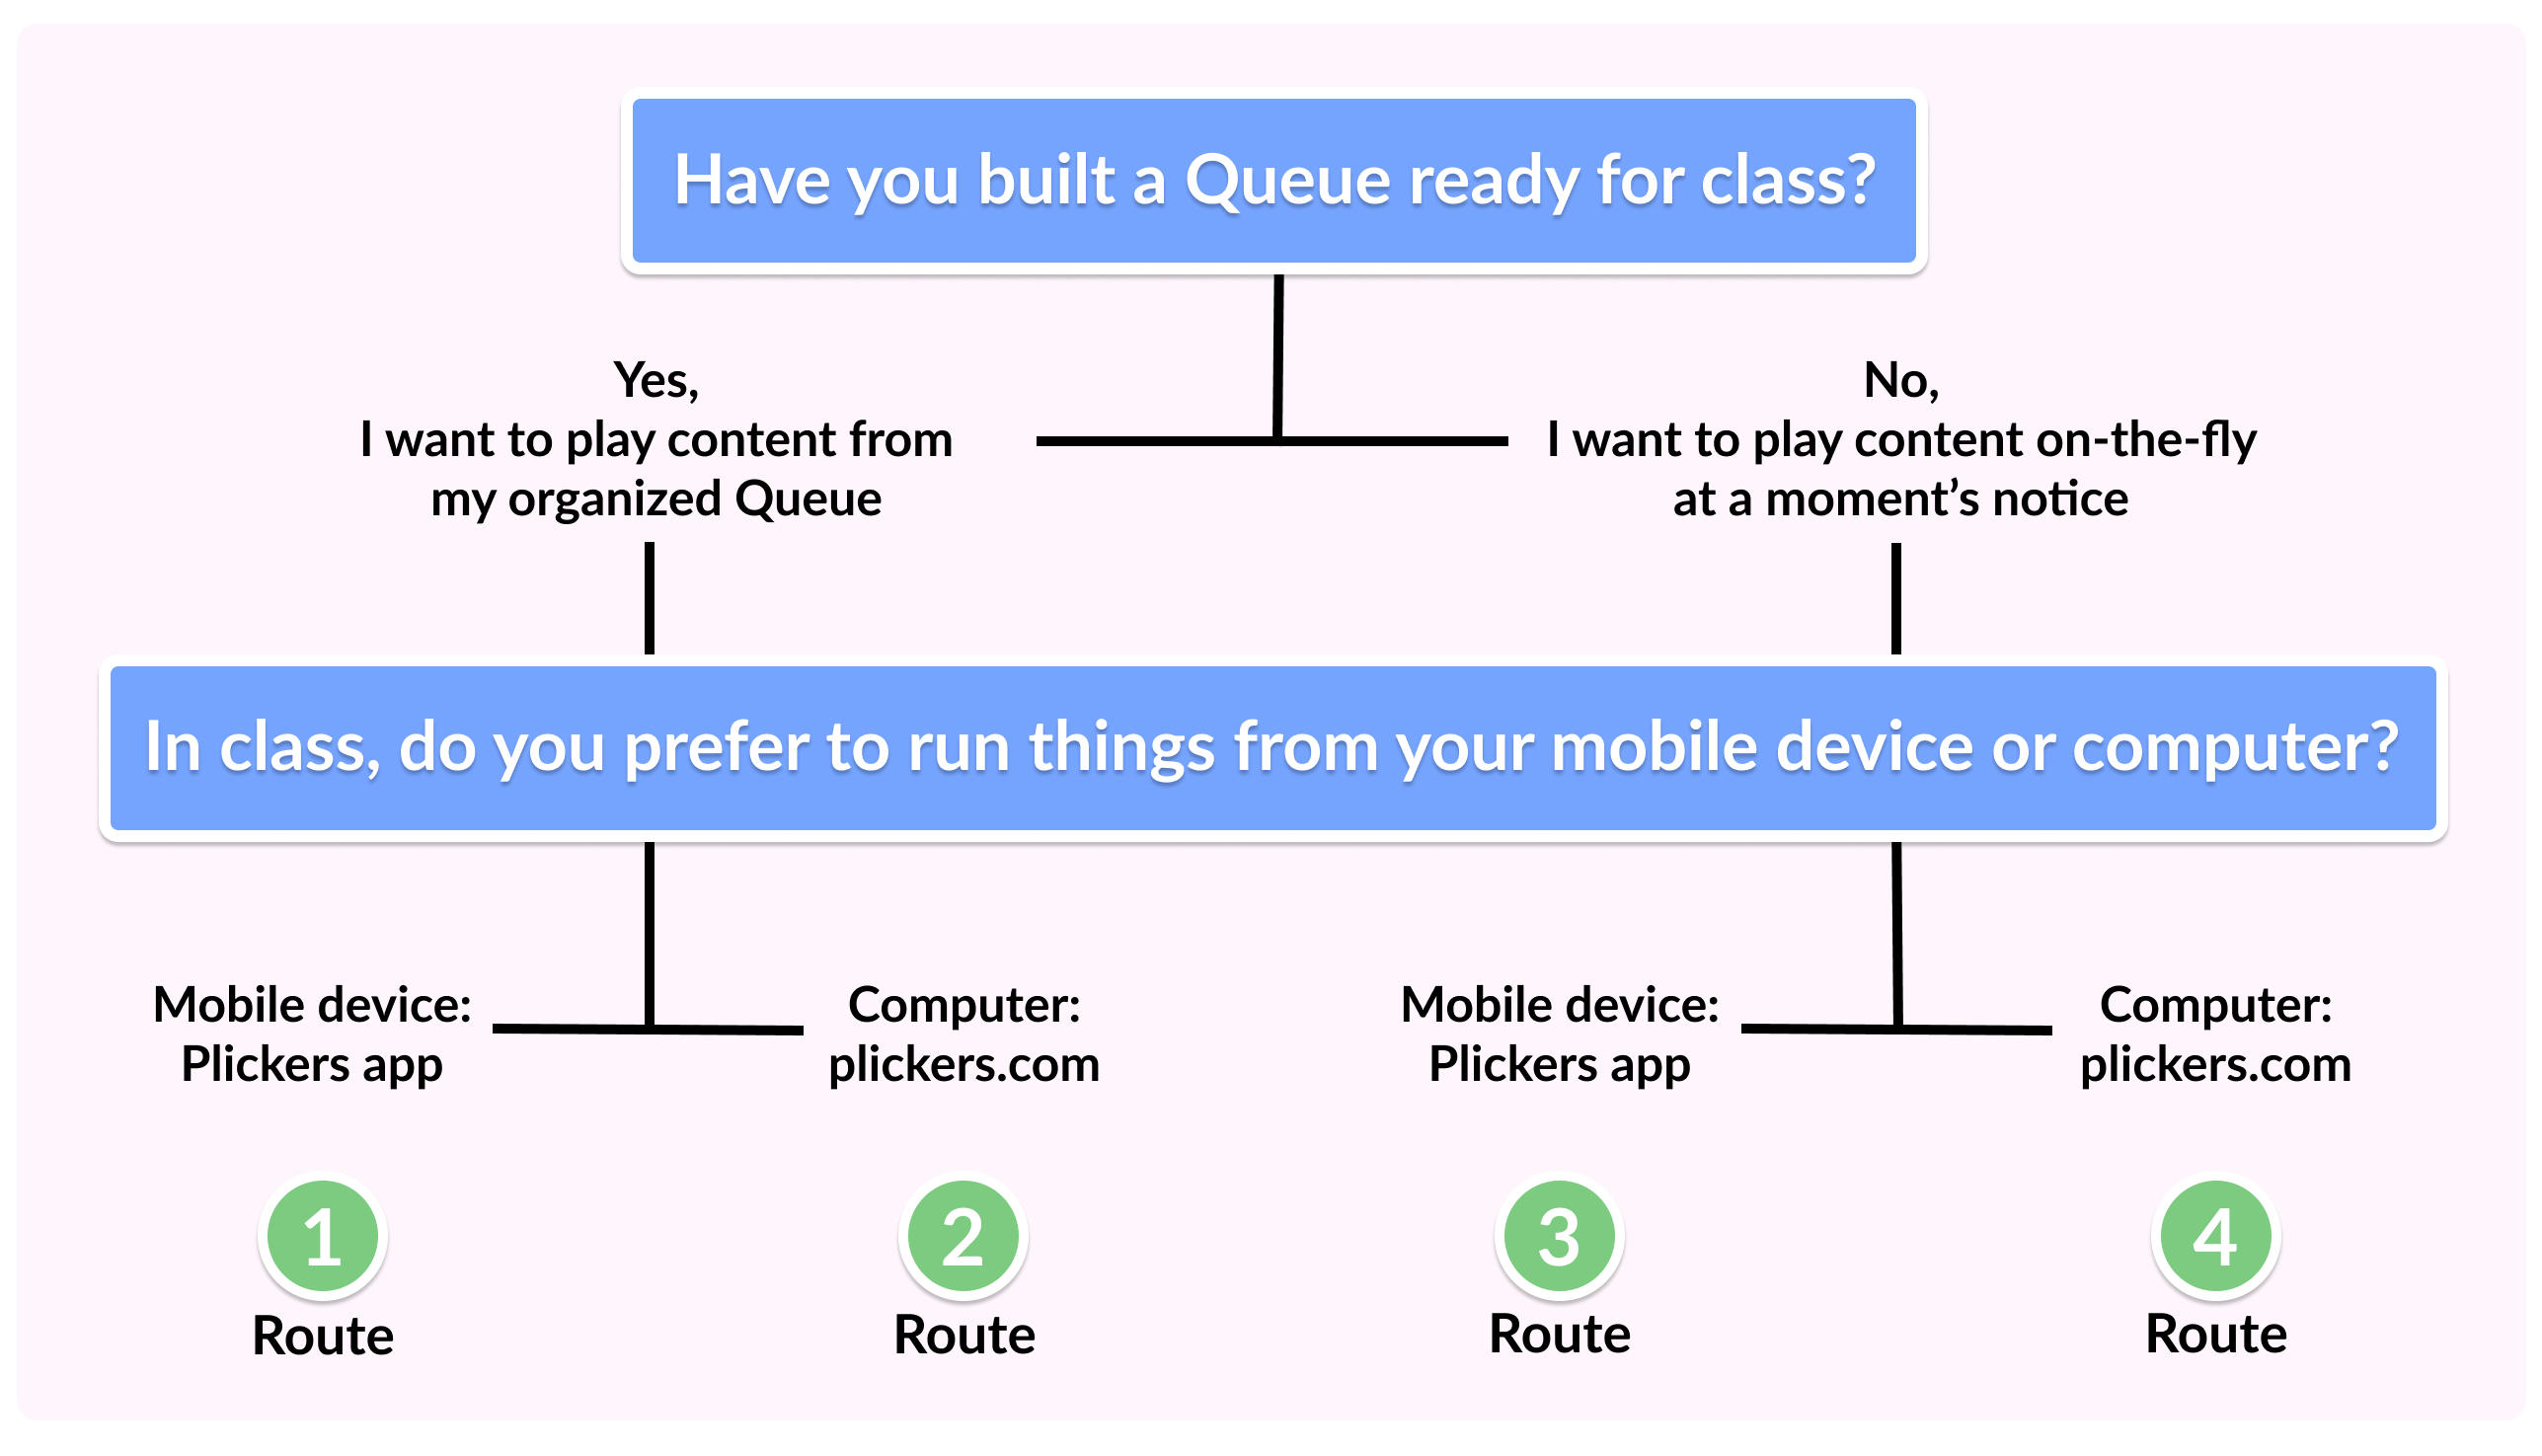
In addition to the above, when playing content on-the-fly (routes 3 and 4), you'll be able to choose whether to navigate through the Classes section of your Plickers account, or the Content section.
For Queue-based Plickers sessions
So, you've assembled your Queue, your students have all filed into the classroom, their cards are at the ready, and you're about to start your Plickers session. Here's how:
For details on how to assemble your Queue before you start class, have a browse through this link.
Route 1: Using your Queue and the mobile app
Before you start with the app, remember your computer should be logged in to plickers.com and connected to your projector, with the Now Playing screen displayed.
-
Open your Plickers app and sign in
The app will open on the Classes tab.
If you're in a different tab, tap on the
 icon at the bottom of the screen.
 -
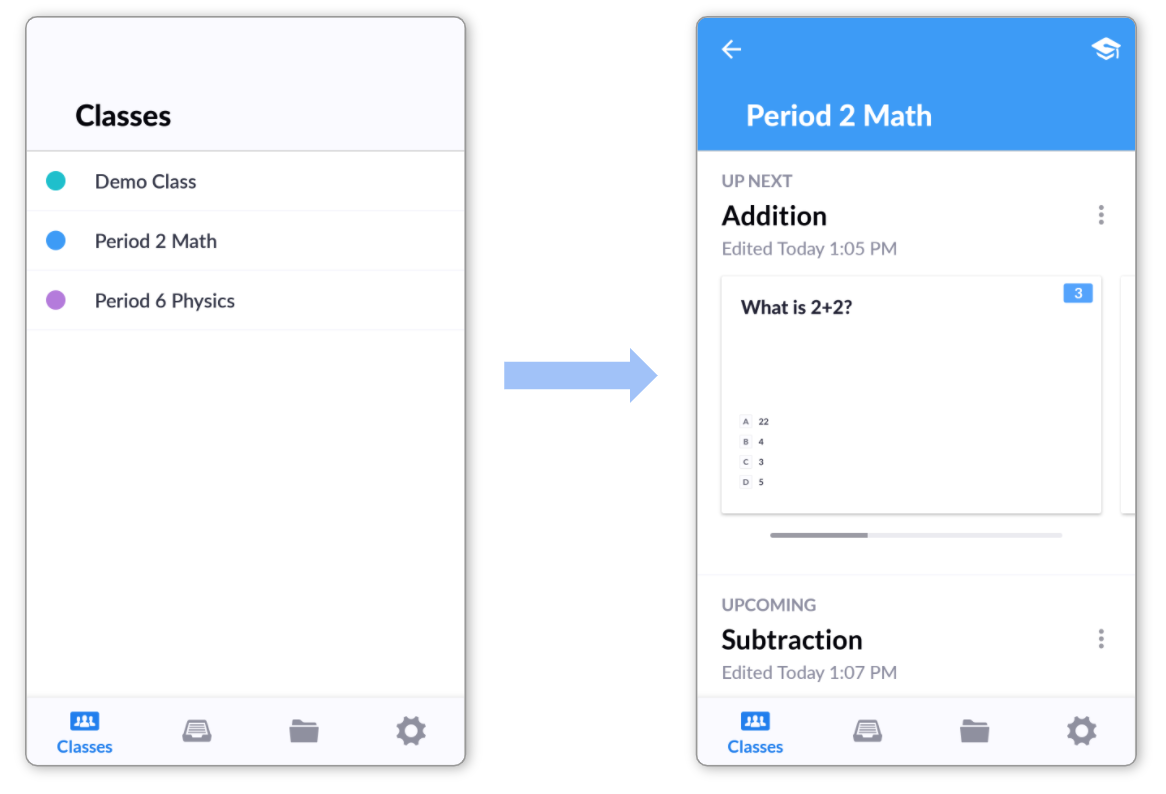
Select the Class you want to work with
You'll be taken to the Queue you prepared earlier.
As an example, our Queue for Period 2 Math is showing in the right-hand image below. You can see that our Addition Set appears first, followed by our Subtraction Set.
-
Tap on the first item in the Queue
This will take you to the question launchpad.
Here's the first question within our Addition Set, shown on the right:
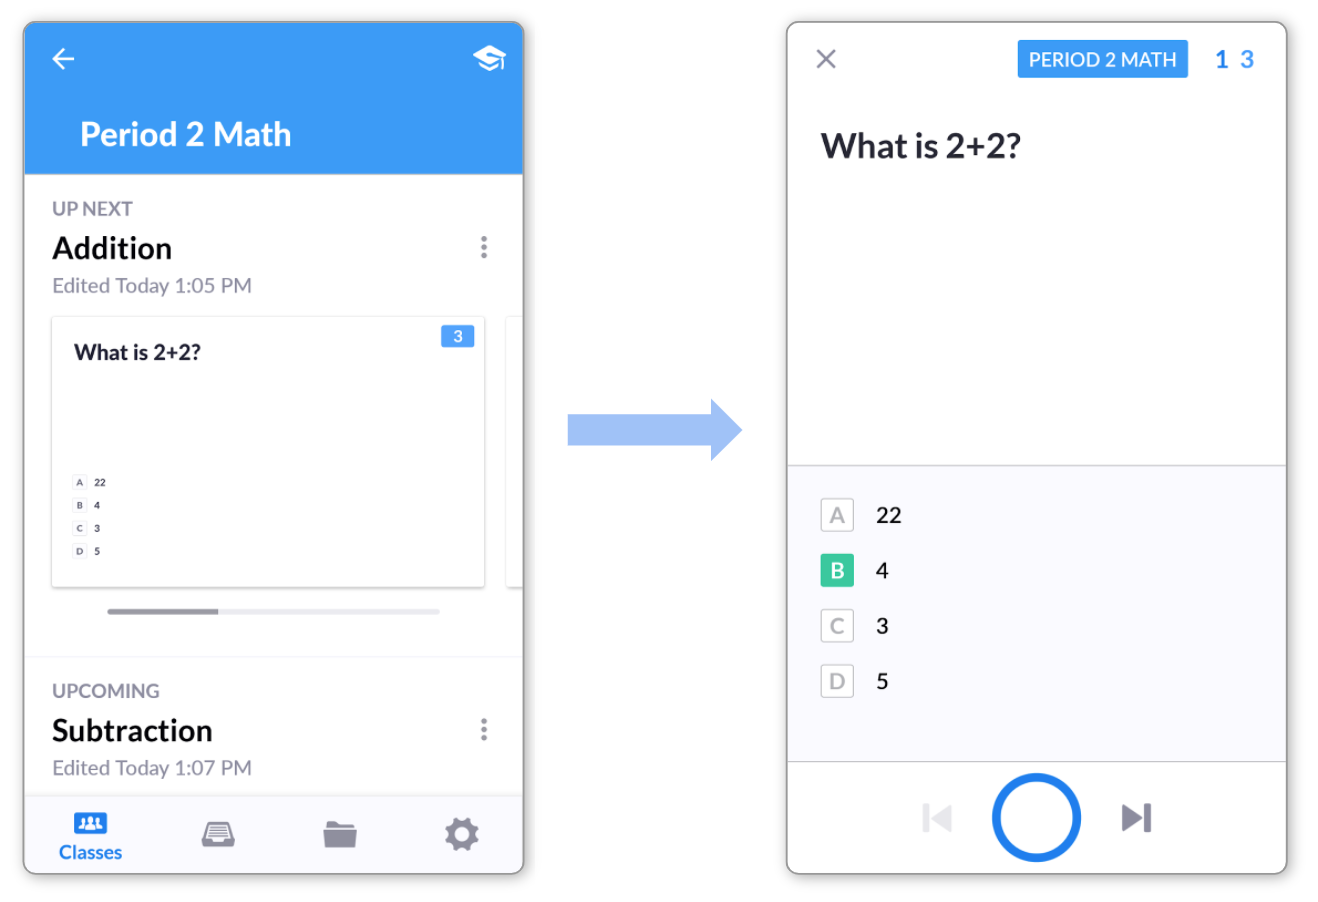
At the same time, the Now Playing screen on your computer will automatically sync with your mobile device, and the question will be displayed for your students.
-
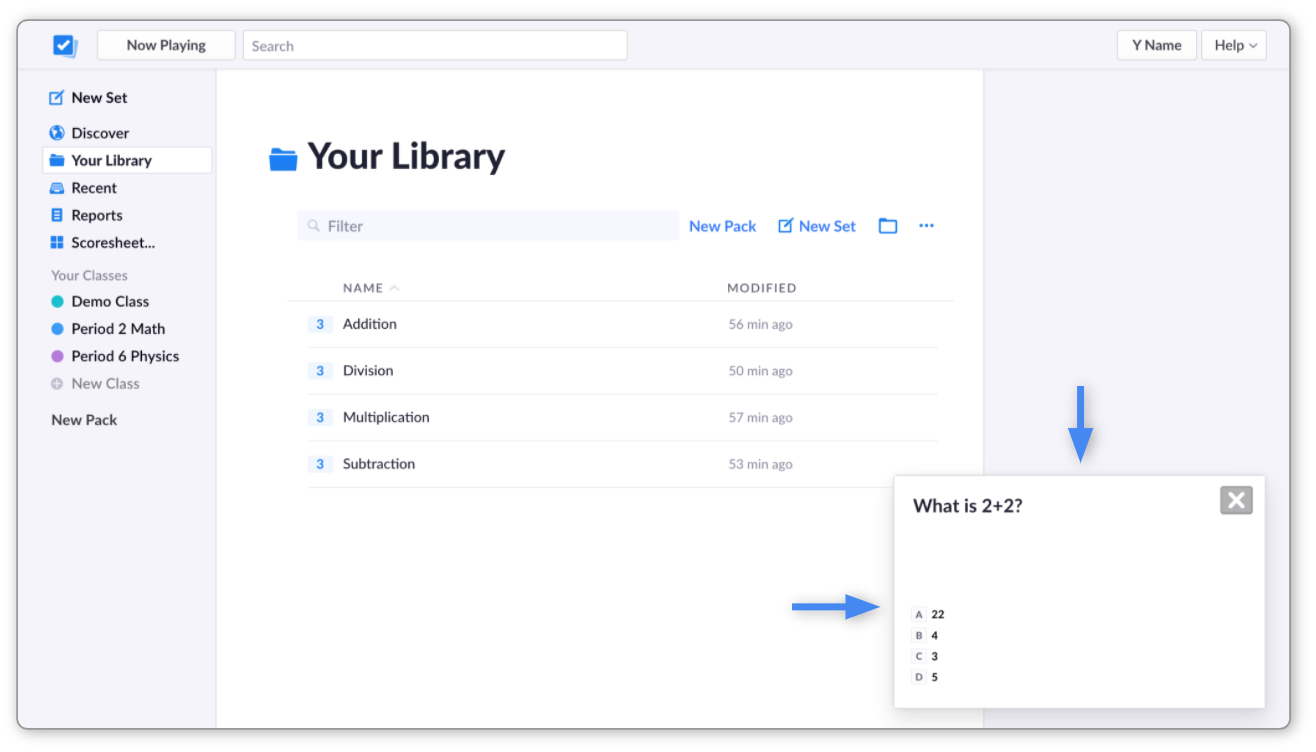
...you'll see a popup in the bottom right-hand corner of your computer screen, which you can click:
-
-
You can now ask your question and enter the scanner
More infoNext you'll scan your students' cards to log their answers. For more details on this, visit our How-to guide here.
Back to top
Route 2: Using your Queue and plickers.com
If you prefer to operate within plickers.com as much as possible, here's how to display the first item in your Queue, using your computer:
You'll need the Plickers app open and within reach, to be able to scan your students' cards as they answer your questions.
-
Head over to plickers.com on your computer, and sign in
-
From the left-hand sidebar of your homepage, select your Class
You'll be taken to your Class homepage, and the Queue you've assembled will be showing at the top of the page.
-
Click on Play Now, located underneath the title of your first Queue item
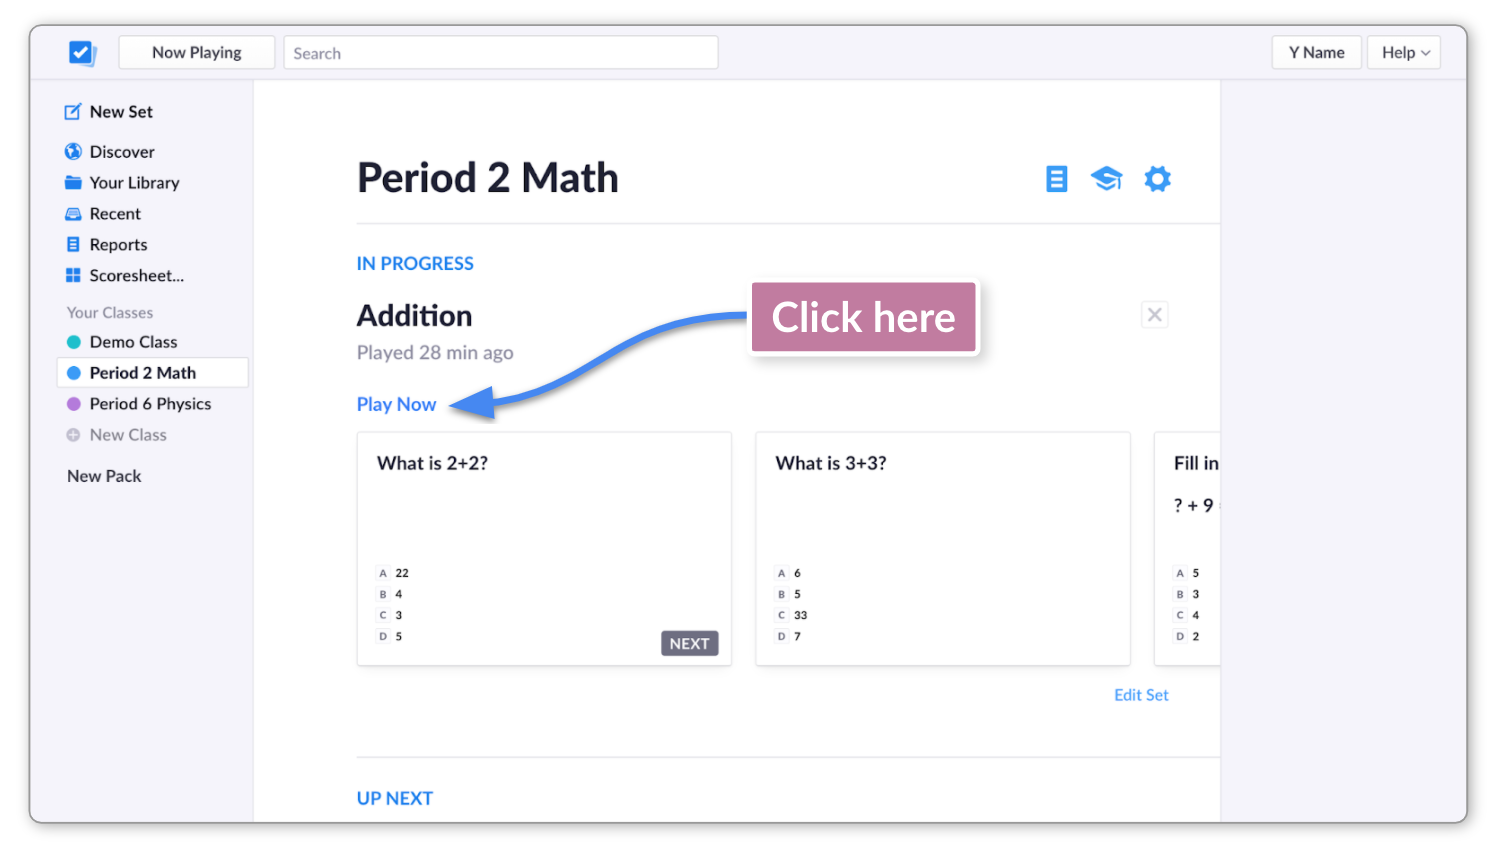
You'll enter the Now Playing screen, which will show your first question.
We'd recommend connecting to your projector at this point.
More infoIf you're using E-Learning for a remote class, you'll need to stay within plickers.com and run things from there. Here's a link to some more information about this.
-
Open the Plickers mobile app
You'll see the title of your item has popped up within a gray box at the bottom of the screen.
-
Tap on the gray box at the bottom of the screen
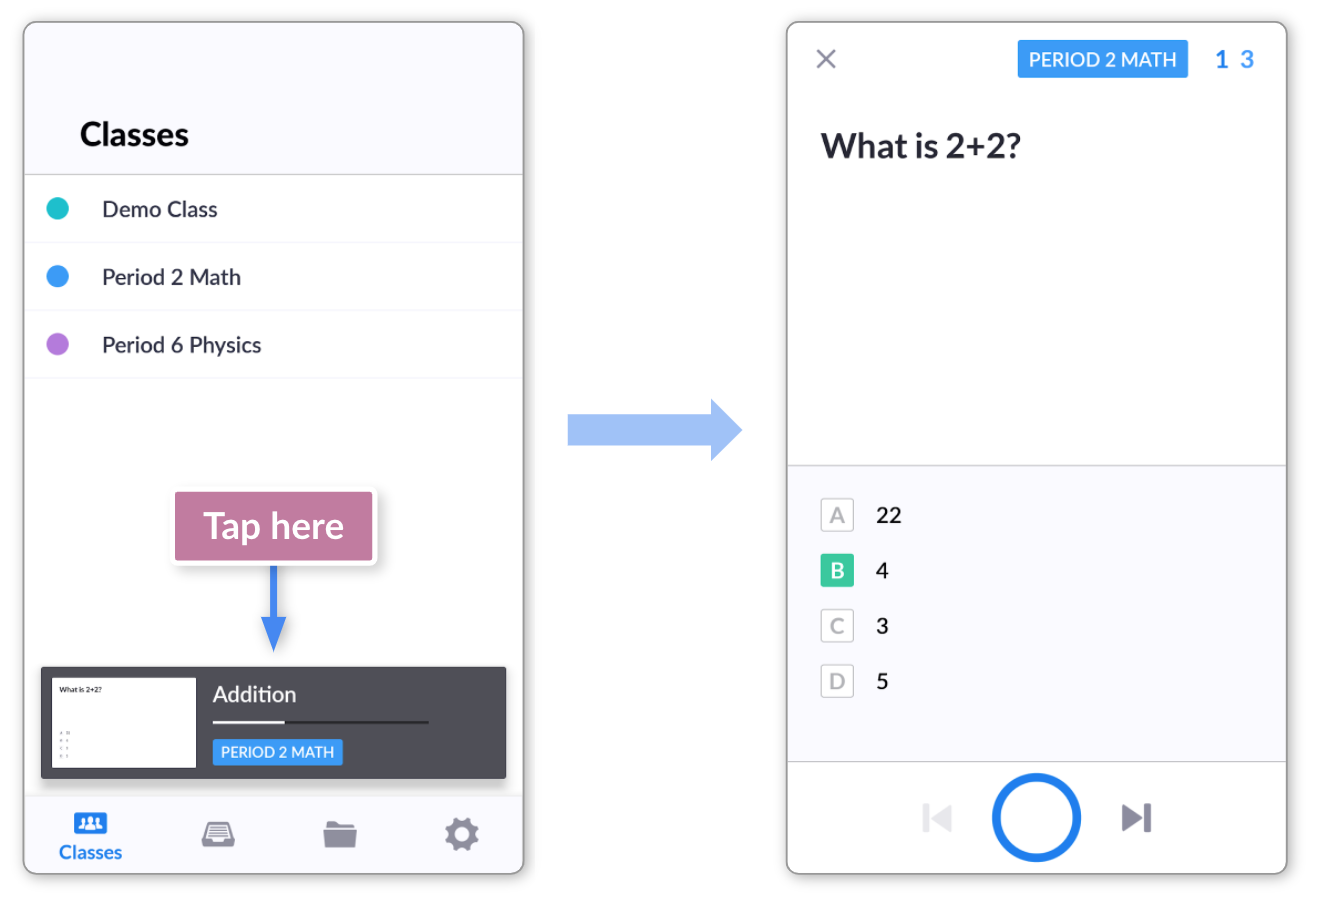
This will take you to the question launchpad, from which you can ask your question, tap the blue circle button, and start scanning.
Back to top
For spontaneous Plickers sessions
Some teachers like to use Plickers as a more spontaneous tool, and even those who favor a structured approach might sometimes like to go with the flow. So, below are the routes you can take to play your Plickers content on-the-fly.
This time, you have two options within both the mobile app and plickers.com - you can either go via your library of content or via your Classes section.
Route 3: Play content on-the-fly using the mobile app
Because we like to use the Plickers mobile app as an in-class remote control, this would be our recommended approach for playing content to your students at a moment's notice.
-
Moving through your content section is probably the easiest method, and here's how it's done:
TipRemember your computer should be logged in to plickers.com and connected to your projector, with the Now Playing screen showing.
-
Open the Plickers app and sign in
-
Tap on either the
 icon or the
  icon
iconThe
 icon (Recent) shows content that has been interacted with recently, ordered chronologically.
The
 icon (Library) shows all your content listed in alphabetical order. Your Packs will be displayed first, followed by everything else (your Folders, Sets and stand-alone Questions).More info
To explore the different ways you can create content within Plickers, feel free to browse our articles here.
-
Tap on the item title and start playing your content
This can be done using slightly different methods, depending on the type of content:
-
-
After tapping on a Pack title, you'll see the Pack page. This displays any relevant info, and lists all the Sets/Questions contained within.
-
The same applies for any Folders in your library.
-
You can then play your Set or stand-alone Question as shown in the relevant toggle menus below.
-
-
-
After tapping on a Set title, the questions within that Set will appear, and you'll be able to scroll through them.
NoteIt's not possible to edit content here, as the app is intended to be used just for display purposes at this point.
-
To play your Set, tap on the blue Play button.
-
-
-
Stand-alone Questions are a little different to Sets. After tapping on the Question title, you'll be taken to the Question in full.
NoteIt's not possible to edit content here, as the app is intended to be used just for display purposes at this point.
-
In the top right-hand corner, you'll see the Play icon
 . Tap this to play the stand-alone Question to your class.
-
TipFor a more direct route (to skip step 3 altogether), tap on the Play icon
 located to the left of each Set/Question title, listed within your Recent or Library menus.
For whichever Play button you choose, once you select it, a list of your Classes will pop up at the bottom of your app screen.
-
-
Select the Class you're currently teaching
The launchpad screen for the first question will then appear:
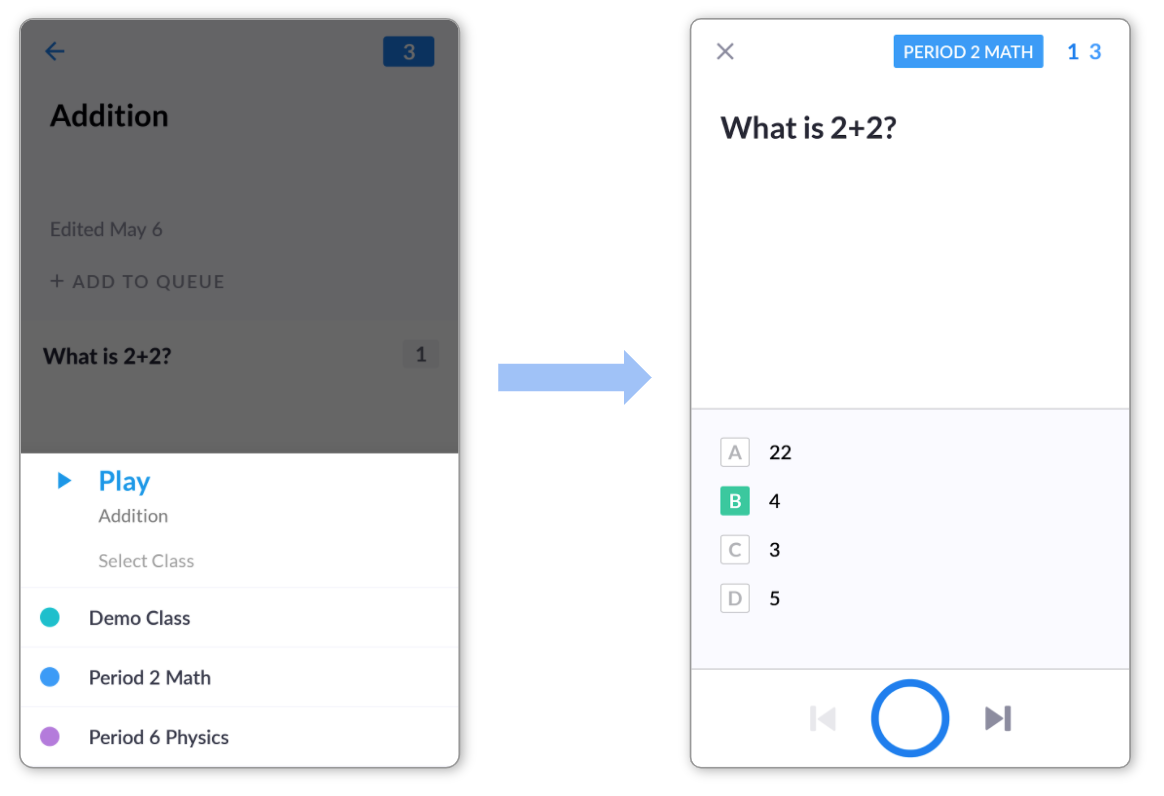
At the same time, the Now Playing screen on your computer will automatically sync with your mobile, and the question will be displayed for your students.
-
...you'll see a popup in the bottom right-hand corner of your computer screen, which you can click:

More infoNext you'll scan your students' cards to log their answers. For more details on this, visit our How-to Guide here.
-
Head back up to check out route 3b
-
-
Using your Classes section to navigate is mainly useful if there's something deep down in your Queue that you'd like to play first.
-
Open the app and select the Classes icon
 at the bottom of the screen
 -
Select the Class you're working with
You'll be taken to the Class Queue:

-
Scroll through your Queue and tap on the item you'd like to play
You'll be taken to the launchpad for your first question.
At the same time, the Now Playing screen on your computer will automatically sync with your mobile device, and the question will be displayed for your students.
-
...you'll see a popup in the bottom right-hand corner of your computer screen, which you can click:

-
Head back up to check out route 3a
-
Back to top
Route 4: Play content on-the-fly using plickers.com
If you're more comfortable operating within plickers.com, you can use your computer to select content to play right away.
-
Again, moving through your content section is probably the most effective method here.
NoteYou'll need the Plickers app open and within reach, to be able to scan your students' cards as they answer your questions.
-
Head over to plickers.com on your computer and sign in
-
Select Your Library from the left-hand sidebar
The page will then show all the content you have access to.
Packs appear at the top. Sets, Folders and Questions are listed further down the page.
More infoYou can use the Recent page, the Search bar, or the Filter bar to find your content within plickers.com. Head over to this article to find out more.
-
Click on the content you want to play to your students
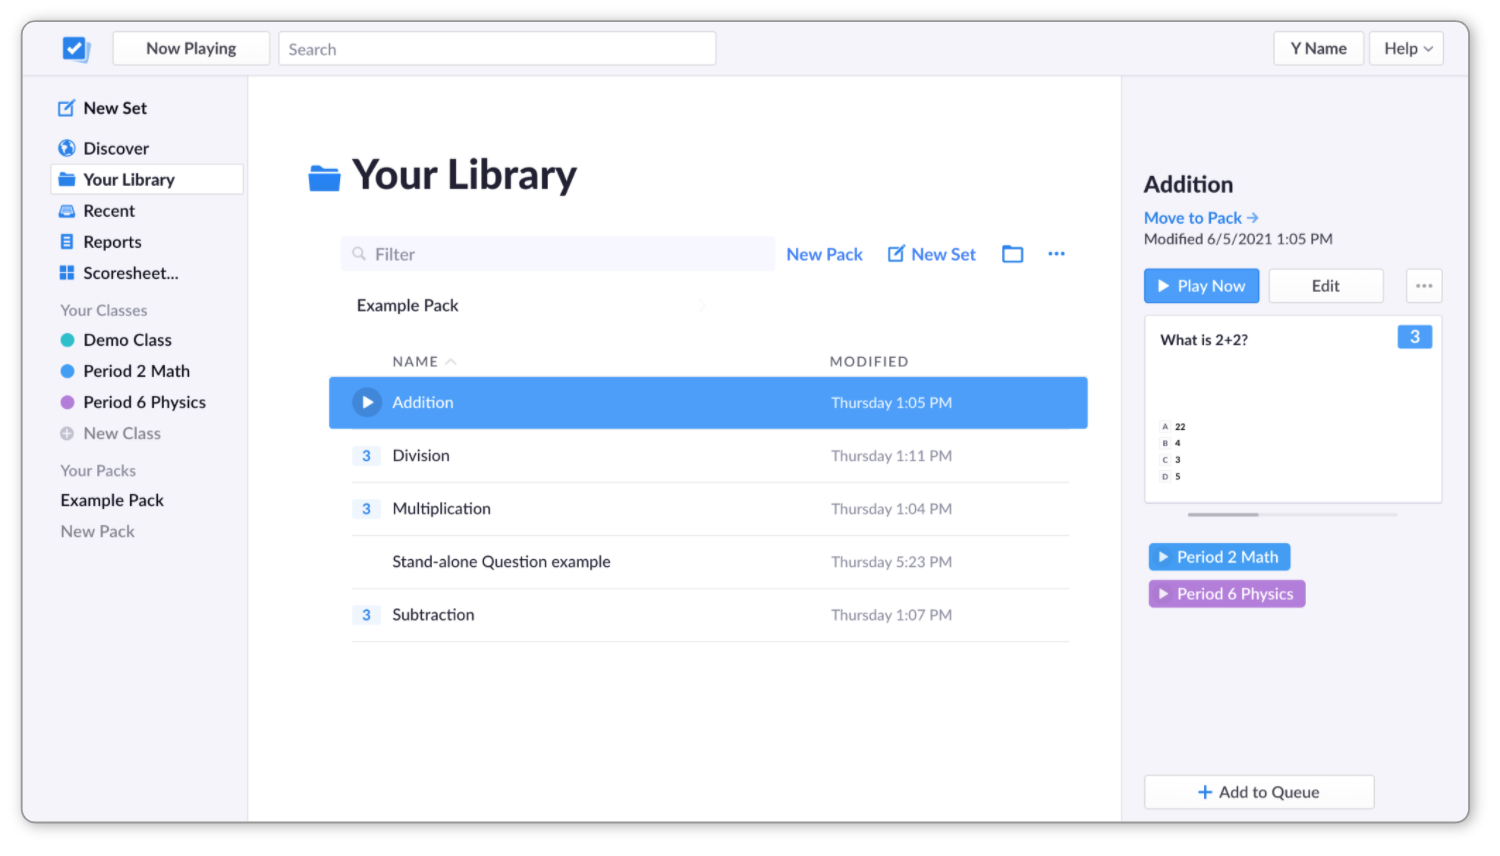
It'll become highlighted in blue, and you'll see options appear in the right-hand sidebar, like in the image below.
Note that if your content exists within a Pack or Folder, you'll have to click into those items first.
 Tip
TipIf the content selected is already part of a Queue, you'll see the relevant Classes listed on the right (in blue and purple in the image above). If you play items using these buttons, you'll skip steps 4 and 5 below, but this will impact the arrangement of your Queue.
-
Select the blue Play Now button in the right-hand sidebar
You can also click the Play icon that appears to the left of the Set/Question title (if it's been selected and highlighted in blue).
A popup window will appear, containing a list of your Classes (shown in the next step).
-
Select the Class for which you'd like to play your content
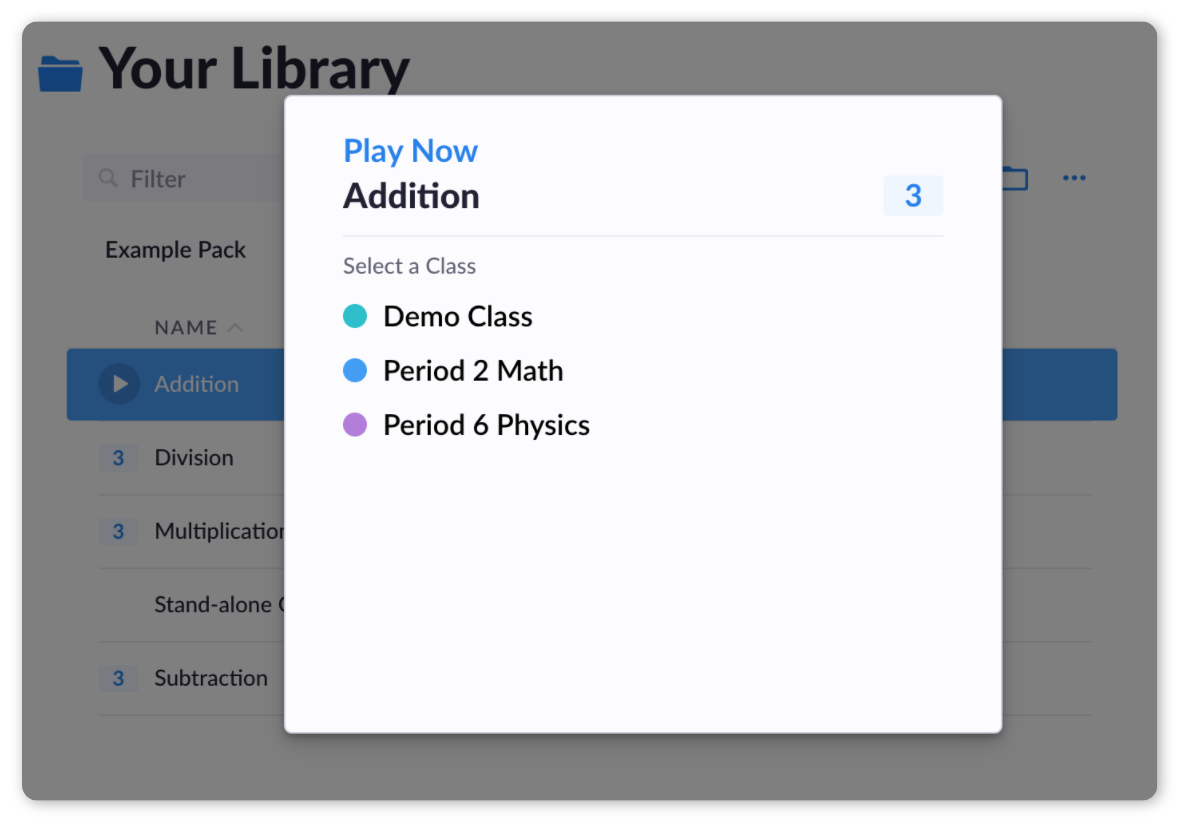
The Now Playing window will then open, and your first question will appear.
Connect your screen to the projector at this point.
More infoIf you're using E-Learning for a remote class, you'll be staying in plickers.com and running things from there. Here's a link to more information about this.
-
Open your mobile app
You'll see that the title of your item has popped up within a gray box at the bottom of the screen.
-
Tap on the gray box at the bottom of the app screen

The question launchpad will open, from which you can ask your first question, tap the blue circle button, and start scanning.
Head back up to check out route 4b
-
-
Playing content on-the-fly via your Class homepage is only really useful if you need to scroll through your Queue to find something to play.
NoteYou'll need the Plickers app open and within reach, to be able to scan your students' cards as they answer your questions.
-
Sign in to plickers.com on your computer
-
Select the relevant Class from your left-hand sidebar
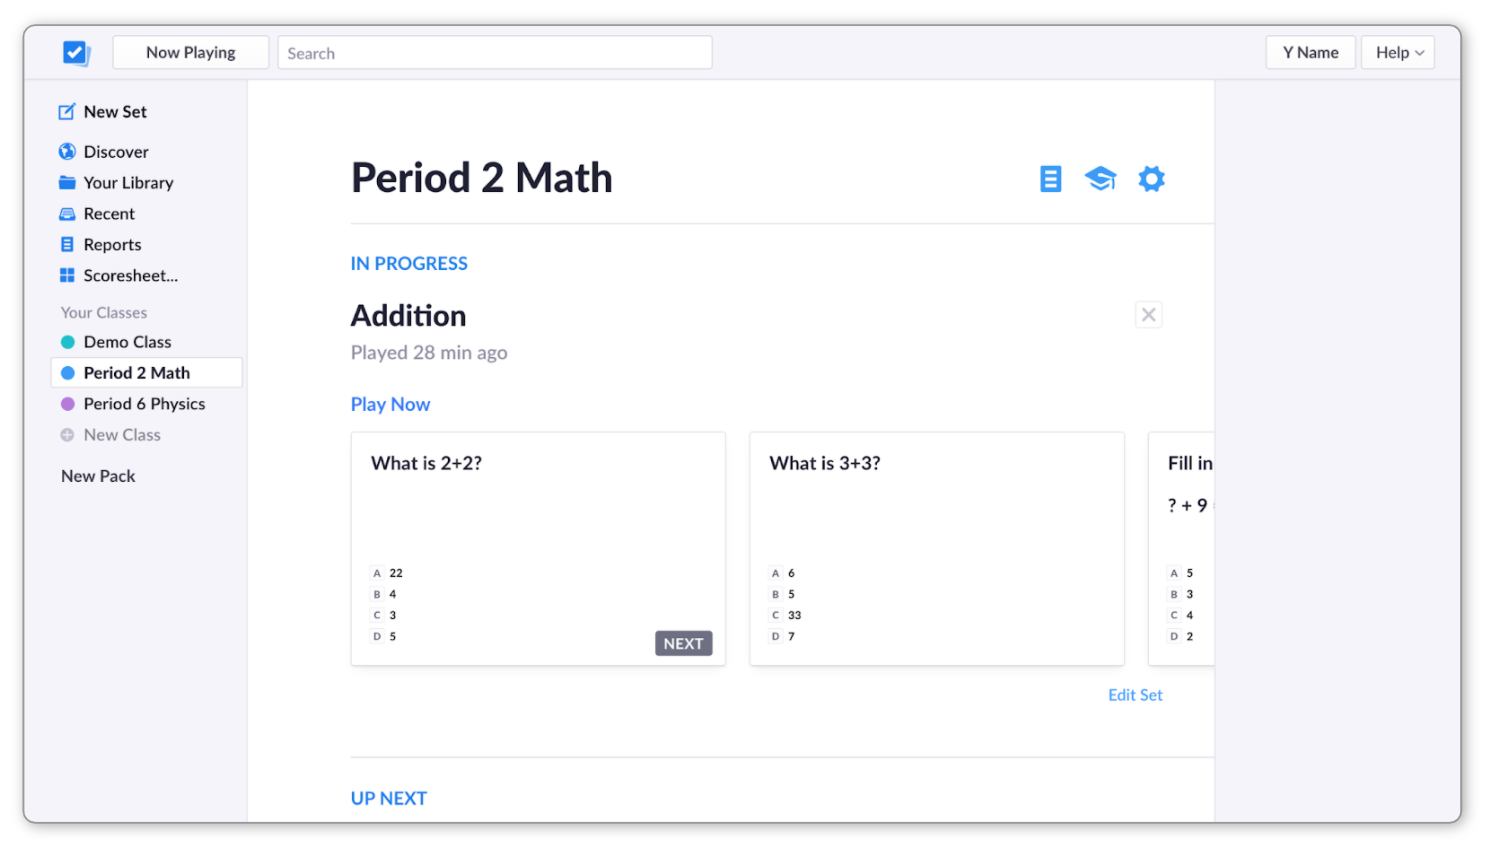
This will take you to your Class homepage and the first item in your Queue will be visible at the top of the page, as shown below:
 More info
For information on how to build and re-arrange your Queue, feel free to head over to our Class Queue article.
-
Scroll down to find the item you'd like to play
If it turns out that the item you're looking for is not in the Queue, you can click on the Add to Queue button and search for your content.
-
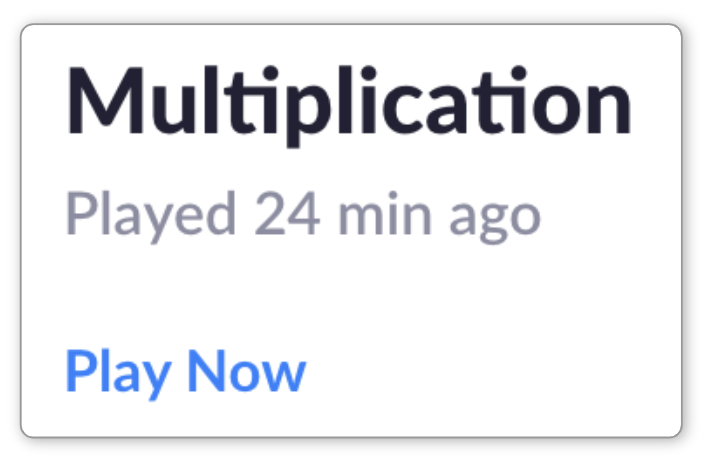
Click on the Play Now link
You'll find this link under the title of each of the items in your Queue, just like the below:
Your Now Playing window will open and you can now connect your computer screen to your projector.
-
Open your mobile app
You'll see that the title of your item has popped up within a gray box at the bottom of the screen.
-
Tap on the gray box at the bottom of the app screen
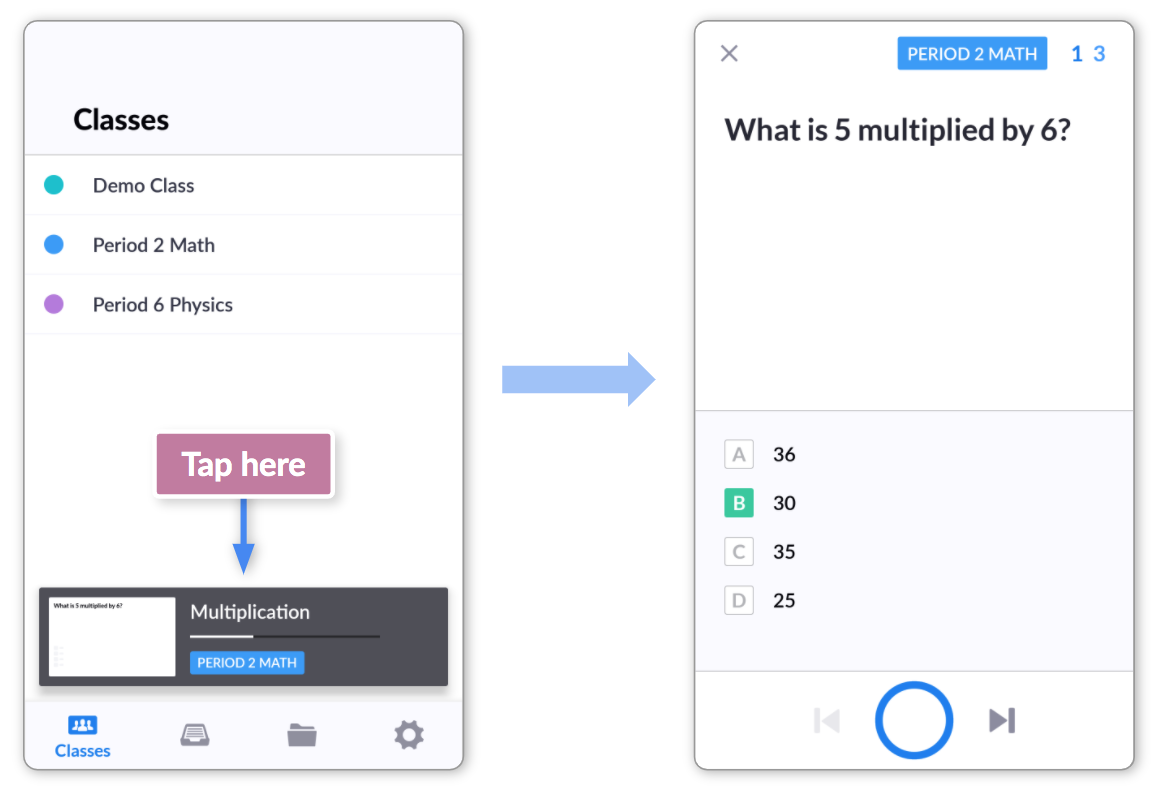
The question launchpad will open, from which you can ask your first question, tap the blue circle button, and start scanning.
Head back up to check out route 4a
-
Back to top
And there you have it. As you can see, there are multiple ways to display your questions to your students, and hopefully you've been able to find the path that's right for you.
If you need any more assistance, please feel free to contact our support team through this link.
Comments
0 comments
Article is closed for comments.